4 Channel Amp for Sub and Speakers
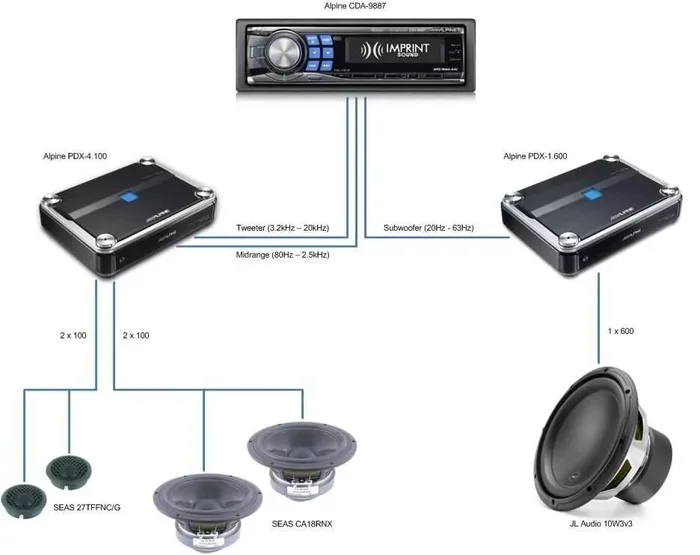
A 4 channel amp for sub and speakers can power your front and rear speakers while driving a compact subwoofer, if you wire it right. You need to match impedance, plan your channels, and protect your gear from overheating or clipping. This guide walks you through setup, wiring options, and simple fixes so you get clean sound without guesswork.
Key Takeaways
- Match impedance first: Check if your sub and speakers are 2 ohm or 4 ohm before connecting anything.
- Plan your channels: A 4 channel amp for sub and speakers can run four full-range speakers or a stereo pair plus a sub, depending on your wiring.
- Use gain, not volume: Set amplifier gain carefully to avoid distortion and protect your speakers.
- Mind power limits: Choose an amp with enough RMS power for your subs and speakers, not just peak numbers.
- Wire cleanly: Keep signal and power cables separate to reduce noise and humming.
- Watch heat and airflow: Give your amp space, especially if you push it hard with low-impedance loads.
- Test before finalizing: Start low, listen for distortion, and adjust slowly for the best sound.
📑 Table of Contents
- Why a 4 Channel Amp for Sub and Speakers Makes Sense
- Understanding Channels, Power, and Impedance
- How to Wire a 4 Channel Amp for Sub and Speakers
- Choosing the Right Amp for Your Sub and Speakers
- Setting Gain, Crossovers, and Bass the Right Way
- Common Mistakes and How to Avoid Them
- Expert Tips for a Cleaner, Louder, More Reliable Setup
- Quick Checklist Before You Power Up
- Final Thoughts on a 4 Channel Amp for Sub and Speakers
Why a 4 Channel Amp for Sub and Speakers Makes Sense
If you want better sound in your car, a 4 channel amp for sub and speakers is a smart starting point. It gives you enough channels for a full stereo setup and still leaves room for a subwoofer. You do not need a giant stack of gear to hear a real difference. You just need the right match between your amp, speakers, and sub.
Many people think an amplifier is only for huge systems. That is not true. Even a modest setup sounds cleaner with proper power. A 4 channel amp can handle front and rear speakers while also feeding a sub, if you plan the wiring well. This keeps your dashboard tidy and your sound balanced.
The key is to understand what each channel does. Some channels run speakers. One channel may run a sub. You can also bridge channels in some amps to get more power for a sub. That said, bridging changes how you wire things, so you need to follow the amp manual closely.
In this guide, I will keep things simple. We will talk about impedance, wiring, gain, and common mistakes. You will also find practical tips you can use right away. If you want a clear path from parts to playback, this is it.
Understanding Channels, Power, and Impedance
Before you buy or wire anything, you need to know three things: channels, power, and impedance. These three ideas decide whether your system sounds good or sounds stressed.
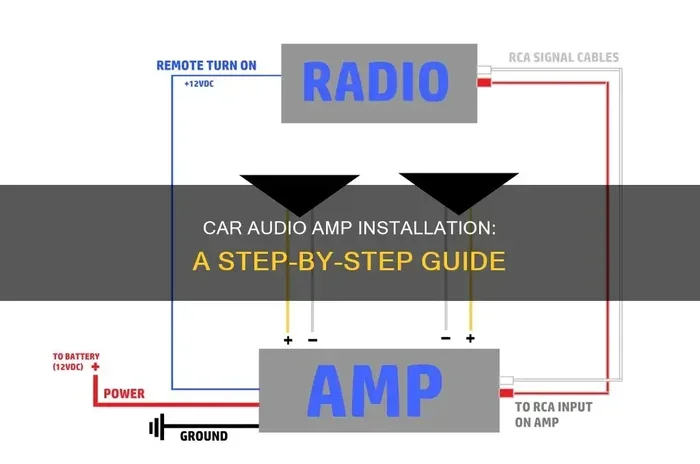
Visual guide about car audio amplifier wiring
Image source: shunauto.com
Channels and What They Do
A 4 channel amp for sub and speakers usually has four independent channels. Each channel can power one speaker or one side of a stereo pair. That means you can run four full-range speakers, or two speakers and save space for a sub setup.
Some people use two channels for front speakers and two for rear speakers. Others use two channels for speakers and bridge the remaining two for a sub. The best choice depends on your gear and your goals. If you want louder bass, bridging may help. If you want even sound everywhere, separate channels may be better.
RMS Power Matters More Than Peak Power
Peak power looks impressive on a box. RMS power tells you what the amp can handle on a normal basis. When you match an amp to a sub or speakers, focus on RMS numbers. This helps you avoid weak sound or overloaded gear.
Think of RMS as the steady work an amp can do. Peak power is more like a short sprint. You want enough steady power for clean music, not just a big number for show.
Impedance Is the Hidden Dealbreaker
Impedance is the resistance your speakers and sub present to the amp. It is usually measured in ohms. Common values are 2 ohm and 4 ohm. If you mix things badly, you can overload the amp or starve the speakers.
This is where many setups go wrong. A 4 channel amp for sub and speakers may handle a 4 ohm load easily, but struggle with a 2 ohm load if it is not designed for it. Always check the amp label and the speaker specs. If you want a deeper dive on impedance, you can read more about the difference between 2 and 4 ohm speakers before you finalize your setup.
How to Wire a 4 Channel Amp for Sub and Speakers
Wiring is where the project becomes real. A good wire job keeps signal clean and power stable. A messy job can cause noise, weak bass, or even damage. Let us break it into simple steps.
Plan the Layout First
Start with a sketch. Decide where the amp will sit. Decide where the sub will go. Then decide which speakers connect to which channels. This sounds basic, but it saves a lot of frustration later.
Keep the amp close to the sub or speakers if possible, but do not block airflow. Also keep the remote turn-on wire, power wire, and ground wire in mind early. Good planning makes the install cleaner and safer.
Speaker Wiring Options
There are a few common ways to use a 4 channel amp for sub and speakers.
- Run four speakers on four channels for even coverage.
- Run two speakers on two channels and use the other two channels for a sub.
- Bridge two channels for a sub and use the other two for speakers, if the amp supports bridging.
If you are wondering how to connect four speakers to a 2 channel amp in a different setup, that is a separate challenge. In a 4 channel amp for sub and speakers, you usually have more flexibility. Still, you should keep the load within the amp’s rated range.
Subwoofer Wiring Basics
Subwoofers often need more power than small speakers. That is why people often dedicate one or two channels to the sub. If your sub is a single voice coil, wiring is simpler. If it has dual voice coils, you have more options, but also more decisions.
When wiring a sub, keep polarity consistent. Positive goes to positive. Negative goes to negative. Reversing this can make the sub move the wrong way and weaken bass. It is a small mistake, but it matters a lot.
If you want a more detailed walkthrough, you can also check how to wire 4 speakers to a 2 channel amp for general speaker wiring ideas that still apply to some parts of your install.
Keep Signal and Power Separate
A clean install is a quiet install. Try not to run RCA cables right next to power cables for long distances. If they must cross, cross them at one point instead of running them side by side. This helps reduce humming and buzzing.
Also use proper connectors. Loose splices cause resistance and heat. Good crimps or solder joints make the system more reliable. A little care here goes a long way.
Choosing the Right Amp for Your Sub and Speakers
Not every 4 channel amp is the same. Some are built for clean stereo sound. Some are more flexible for mixed setups. Here is what to look for.
Power Matching
Match the amp’s RMS output to your speakers and sub. If the amp is too weak, the sound may distort when you turn it up. If the amp is too strong, you can still be fine as long as you control gain and protect the speakers. The main goal is balance.
For subs, many people want extra headroom. That means the amp can deliver more power than the sub needs at normal listening levels. Headroom helps the sub stay clean during loud passages.
Impedance Support
Check what loads the amp can handle. Some amps are stable at 4 ohm per channel. Some handle 2 ohm loads. Some can bridge for a lower impedance sub load. The safe choice is to stay within the manufacturer’s guidelines.
If your speakers are 4 ohm and your sub setup ends up near 2 ohm on a bridged channel, you need to be careful. When in doubt, read the amp manual and verify the final load. You can also learn more about the difference between 4 and 8 ohm speakers if your gear includes mixed impedances.
Features That Help Daily Use
A few features make life easier.
- Bass boost, if used gently, can add low-end punch.
- Crossovers help send bass to the sub and mids to the speakers.
- Gain controls let you set levels without pushing the amp too hard.
- Thermal protection helps the amp survive hot days and heavy use.
These features are useful, but they are not a substitute for good wiring and proper gain setting.
Setting Gain, Crossovers, and Bass the Right Way
Once everything is wired, the next step is tuning. This is where many people rush. Do not rush here. Good tuning makes the system sound better and last longer.
Set Gain Carefully
Gain is not the same as volume. Volume controls how loud the source is. Gain controls how much the amp boosts that signal. If gain is too high, you get distortion. If it is too low, you waste power.
A simple method is to start low. Play music at a normal level. Increase gain slowly until the sound gets clean and strong, then stop. If you hear cracking or buzzing, back it off. That is the basic idea.
Use Crossovers to Split the Work
Crossovers decide which frequencies go to which speaker. High-pass filters let treble and mids through to your speakers. Low-pass filters send bass to the sub. This keeps each driver doing what it does best.
For a 4 channel amp for sub and speakers, crossovers are especially helpful. They reduce strain on small speakers and keep the sub focused on bass. The result is usually cleaner sound and less muddiness.
Bass Boost: Use It With Care
Bass boost can be fun, but too much can muddy the sound and stress the amp. Use it lightly if at all. A small amount may help certain music styles. A large amount often makes things boomy rather than tight.
Think of bass boost as seasoning. A little can improve the flavor. Too much ruins the dish.
Common Mistakes and How to Avoid Them
Even a good amp can sound bad if the setup is off. Here are the most common issues and how to fix them.
Mistake 1: Ignoring Impedance
Some people connect speakers and subs without checking the total load. That can lead to overheating or poor performance. Always calculate the load and compare it to the amp’s limits.
Mistake 2: Turning Gain Too High
More gain does not always mean better sound. In fact, too much gain often creates distortion. Set it for clean output, not maximum output.
Mistake 3: Poor Ground Connection
A weak ground can cause noise and unstable behavior. Make sure the ground point is solid, clean, and tight. A good ground is one of the cheapest ways to improve reliability.
Mistake 4: Overstuffing the Install
Cramming wires, subs, and amps into a tight space can trap heat. Heat is the enemy of electronics. Leave room for airflow and keep connections accessible.
Mistake 5: Forgetting to Test Before Finalizing
Do not bolt everything down permanently right away. Test the system first. Listen for distortion, check for heat, and confirm the sub is moving correctly. Small adjustments now save big headaches later.
If you are expanding your system later, you may also want to think ahead about speaker counts and channel needs. For example, some readers eventually look at wiring 6 speakers on a 4 channel amp when they add more drivers. Planning early helps you avoid rework.
Expert Tips for a Cleaner, Louder, More Reliable Setup
Here are a few practical tips that make a real difference.
- Use quality RCA cables for a cleaner signal.
- Keep wire lengths reasonable so you do not waste power.
- Label your wires during install. Future-you will be grateful.
- Check fuse ratings on the power line for safety.
- Start with moderate volume when testing new wiring.
- Listen to music you know well so you can spot changes easily.
If you want to compare setups, it helps to think about your goals. Are you chasing balanced music, stronger bass, or both? A 4 channel amp for sub and speakers can do a lot, but your tuning and wiring decide how well it performs.
It also helps to remember that speakers and subs are not the same thing. Subs handle low frequencies. Speakers handle mids and highs. If you are unsure how they differ in daily use, you can read more about the difference between subs and speakers to sharpen your setup choices.
Quick Checklist Before You Power Up
Use this short list before you turn the system on.
- Impedance is within the amp’s rated range.
- Power, ground, and remote wires are connected securely.
- Signal cables are routed cleanly.
- Gain is set low at first.
- Crossovers are set for the right speakers and sub.
- The amp has enough airflow.
- The sub polarity is correct.
This checklist is simple, but it covers the most important parts. A careful first test is better than a rushed one.
Final Thoughts on a 4 Channel Amp for Sub and Speakers
A 4 channel amp for sub and speakers is a flexible way to improve your car audio without overcomplicating things. You get enough channels for a full speaker setup and enough flexibility to add bass in a smart way. The trick is to match your gear, wire it cleanly, and tune it carefully.
If you take your time with impedance, gain, and crossover settings, you will usually get better results than if you just crank everything up. Good sound is not about pushing harder. It is about setting things up so each part can do its job.
Start with a solid plan. Wire it right. Then listen, adjust, and enjoy the improvement. That is the easiest path to a system that sounds clean, strong, and reliable.
Frequently Asked Questions
Can a 4 channel amp power both a subwoofer and speakers at the same time?
Yes, a 4 channel amp for sub and speakers can do both if you plan the channels carefully. You can use some channels for speakers and dedicate one or more channels to the sub, or bridge channels if the amp allows it.
Do I need to match impedance between the sub and speakers?
You should match the overall load to what the amp can handle safely. The sub and speakers do not have to be identical, but the final impedance on each channel or bridged pair must stay within the amp’s limits.
Is bridging two channels better for a subwoofer?
Bridging can give a sub more power from a 4 channel amp for sub and speakers, but only if the amp supports bridging and the impedance stays safe. Always check the manual before bridging.
How do I set the gain without causing distortion?
Start with the gain low, play music at a normal level, and increase it slowly until the sound is clean and strong. If you hear distortion, back it off a little and stop there.
What is more important, RMS power or peak power?
RMS power matters more because it shows the amp’s steady working power. Peak power is a short-term number and is not the best guide for everyday performance.
Why does my system hum or buzz after installation?
Noise often comes from poor grounding, loose connections, or signal cables running too close to power cables. Check your ground, tighten your connections, and separate the cables where possible.