How to Wire Amp to Door Speakers
Upgrading your car audio starts with knowing how to wire amp to door speakers properly. This process lets you enjoy louder music with better clarity without replacing your factory speakers. We will walk you through every step to ensure a safe and high-quality installation. Get ready to transform your driving experience with powerful sound.
Upgrading your car audio system can make every drive much more enjoyable. Many people want better sound but feel confused by the wiring process. The good news is that connecting an amplifier to your existing setup is simpler than you might think. You do not always need to replace your factory speakers to hear a big difference.
When you learn how to wire amp to door speakers, you unlock better power and control. This setup allows your amplifier to drive the speakers directly. It reduces strain on your head unit and improves overall audio quality. We will cover everything you need to know to get this done right.
This guide is designed for beginners and hobbyists. We will keep things simple and clear. You will learn about tools, wiring methods, and safety tips. By the end, you will feel confident enough to start your project. Let us dive into the details of car audio installation.
Key Takeaways
- Safety First: Always disconnect the battery before starting any electrical work to prevent shorts.
- Signal Source: You can tap into factory wiring or use speaker-level inputs on your amplifier.
- Correct Wiring: Use the correct gauge wire to handle the power output from your amp.
- Polarity Matters: Ensure positive and negative connections match to avoid phase issues.
- Secure Connections: Use solder or high-quality crimp connectors for reliable long-term performance.
- Testing: Test the system at low volume before sealing panels or hiding wires.
- Professional Help: Consider expert help if you are unsure about handling car electrical systems.
📑 Table of Contents
Understanding Your Car Audio System
Before you start cutting wires, you need to understand what you are working with. Your car has a head unit, which is the radio or stereo. It sends audio signals to your speakers. Factory systems often have low power output. This limits the volume and clarity of your music.
An amplifier boosts the signal strength. It takes the weak signal from the radio and makes it strong. Then it sends that power to your speakers. Door speakers are usually the main front speakers in most vehicles. They handle most of the mid-range and high frequencies.
There are two main ways to connect an amp. You can use RCA outputs if your head unit has them. These are line-level signals. They are clean and easy to work with. However, many factory radios do not have RCA outputs. In this case, you need to use speaker-level inputs.
Speaker-level inputs take the signal directly from the speaker wires. This method is very common for aftermarket amps. You need to identify the correct wires in your door harness. This ensures you get the right audio channels. Left and right channels must be kept separate for stereo sound.
Understanding impedance is also important. Speakers have a resistance rating, usually four ohms. Your amplifier must match this rating. Mismatched impedance can damage your equipment. Always check the specs on both your amp and speakers before connecting them.
Types of Amplifier Connections
Amplifiers come with different input options. Some have dedicated RCA ports for line-level signals. Others have spring clips or screw terminals for speaker-level signals. Some modern amps offer both options. This flexibility makes installation easier for various car setups.
If you have a premium factory system, you might need a line output converter. This device changes high-voltage speaker signals to low-voltage RCA signals. It helps protect your new amplifier from incompatible signals. It also allows you to keep factory features like active noise cancellation.
Tools and Materials Needed
Having the right tools makes the job smoother and safer. You do not need a professional workshop, but you do need basics. Gather everything before you start removing panels. This prevents frustration and lost parts during the process.
Visual guide about car audio amplifier wiring
Image source: i.ytimg.com
Here is a list of essential items for your project:
- Wire Strippers: For removing insulation without damaging the copper.
- Crimping Tool: To secure connectors tightly onto wires.
- Electrical Tape: For insulating exposed connections.
- Multimeter: To check voltage and polarity if needed.
- Panel Removal Tools: To pry open doors without scratching paint.
- Speaker Wire: Use good quality copper wire for connections.
- Connectors: Spade terminals or bullet connectors work well.
- Screwdrivers: For removing screws from panels and amps.
You should also have zip ties on hand. They help manage loose wires under the dashboard. Loose wires can rattle or get caught in moving parts. Clean installation looks better and lasts longer. Safety gear like gloves and glasses is also a good idea.
Choosing the Right Wire Gauge
Wire thickness matters for power delivery. Thicker wires have less resistance. This means more power reaches your speakers. For most door speaker setups, fourteen gauge wire is sufficient. If your amp is very powerful, consider twelve gauge.
Do not use thin wires for power connections. They can heat up and cause fires. Always follow the amplifier manufacturer recommendations. Using the correct wire ensures safety and performance. It is a small detail that makes a big difference.
Preparing the Door Panels
Accessing the speakers requires removing the door panels. This step can be tricky depending on your vehicle model. Some cars have screws hidden in armrests or lights. Others use clips that pull straight out. Take your time to avoid breaking plastic clips.
Start by removing any visible screws. Check around the window control panel and door handle. Once screws are out, use a panel tool to pry the edges. Work slowly around the perimeter of the panel. You will hear clicks as the clips release.
After removing the panel, you will see the inner door skin. Locate the factory speaker. It is usually mounted in a bracket or cage. You may need to remove a waterproof cover to see the wires. Be careful not to tear the moisture barrier on the door.
Disconnect the factory wiring from the speaker. You will need this connection point for your new amp wiring. If you are keeping the factory speaker, you will tap into these wires. If replacing the speaker, you will wire the new one directly.
Handling Door Wiring Safely
Car door wires move when you open and close the door. They are designed to flex without breaking. When adding new wires, you must maintain this flexibility. Do not pinch wires in the door jamb. This can cause shorts later.
Use loom tubing to protect new wires. This keeps them safe from moisture and friction. Route the wires along the existing harness when possible. This looks cleaner and reduces the risk of interference. Always test your connections before reassembling the panel.
Connecting the Amplifier Inputs
Now we get to the core task. You need to send the audio signal from the radio to the amp. If you are using speaker-level inputs, locate the factory speaker wires. You will tap into these wires to get the signal. This is a common method for how to wire amp to door speakers without RCA cables.
Identify the left and right channel wires. You can use a multimeter or a test light to find them. Turn the radio on and play music at low volume. Touch the probe to the wires to find the active ones. Be careful not to short the wires together.
Once identified, strip a small section of the insulation. Connect your amplifier input wires to these factory wires. You can use splice connectors for this. They twist onto the existing wire without cutting it. This preserves the factory wiring integrity.
Connect the positive input to the positive signal wire. Connect the negative input to the negative signal wire. Repeat this for both left and right channels. Secure the connections with electrical tape or heat shrink. Loose connections cause static and noise.
Using Line Output Converters
If you prefer a cleaner signal, use a LOC. This device plugs into the factory speaker wires. It then outputs RCA cables to your amplifier. This is often better for high-end audio systems. It isolates the amp from electrical noise in the car.
Install the LOC near the speakers or in the trunk. Follow the instructions provided with the device. Some LOCs require programming to match your factory radio. This ensures the amplifier turns on and off correctly with the radio.
Running Power and Ground Wires
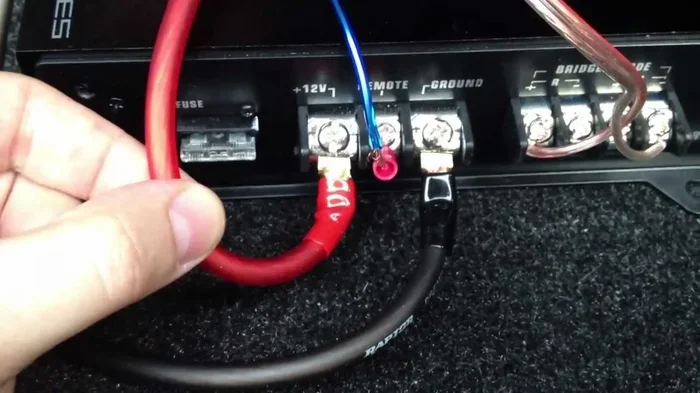
The amplifier needs power to work. You must run a power wire from the battery to the amp. This is usually a thick red wire. It needs a fuse near the battery for safety. The fuse protects the car in case the wire shorts.
Find a suitable location for the amplifier. Many people mount it in the trunk or under a seat. Ensure there is enough airflow around the amp. Amplifiers generate heat during operation. Mounting it securely prevents vibration damage.
The ground wire is just as important as the power wire. Connect a black wire from the amp to a metal point on the car chassis. Scrape off any paint or rust at the connection point. A good ground ensures stable performance and reduces noise.
When running wires through metal, use a grommet. This prevents the wire insulation from being cut. Sharp metal edges can slice through wire over time. A cut wire can lead to electrical failures or fire hazards. Take care when routing wires through the firewall.
Power Distribution Tips
Do not share the power wire with other accessories. Give the amplifier its own dedicated line. This ensures it gets enough current without interference. If you have multiple amplifiers, use a distribution block. This splits the power safely to each device.
Check the fuse rating on your amplifier. Match the fuse on the power wire to this rating. If the amp says thirty amps, use a thirty amp fuse. Using a larger fuse defeats the safety purpose. Using a smaller fuse might blow during normal use.
Finalizing Speaker Connections and Testing
Once the amp is powered and grounded, connect the speaker outputs. Run wires from the amp terminals to the door speakers. You can route these wires along the door harness. Ensure they do not interfere with window mechanisms.
Connect the positive output to the positive speaker terminal. Connect the negative output to the negative speaker terminal. Polarity is crucial for sound quality. If reversed, the speakers will be out of phase. This makes the sound thin and weak.
Before putting the panels back, test the system. Turn on the radio and play some music. Start with the volume low. Slowly increase it to check for distortion. Listen for any buzzing or rattling sounds.
If everything sounds good, secure the wires. Use zip ties to bundle them neatly. Replace the door panels and screws. Make sure all clips are snapped in place. A loose panel can be annoying while driving.
Troubleshooting Common Issues
Sometimes things do not work perfectly on the first try. If you hear no sound, check your connections. Ensure the amp is receiving power and signal. Check the fuse on the power wire. It might have blown during installation.
If you hear a whining noise, it could be a ground issue. Try moving the ground connection to a different spot. Ensure the ground point is bare metal. Engine noise can also enter the system through poor grounding.
Distortion at high volume means the amp is clipping. This happens when the amp is pushed beyond its limit. Lower the gain settings on the amplifier. You do not need maximum gain for good sound. Proper gain setting protects your speakers.
Common Mistakes to Avoid
Installing an amplifier involves electricity and moving parts. There are several pitfalls you should watch out for. Avoiding these mistakes saves time and money. It also keeps your car safe from damage.
- Skipping the Fuse: Never run a power wire without a fuse near the battery.
- Poor Grounding: Painting over the ground point causes resistance and noise.
- Wrong Polarity: Mixing up positive and negative wires ruins stereo imaging.
- Pinched Wires: Running wires through sharp edges damages insulation over time.
- Overpowering Speakers: Ensure your amp power matches your speaker limits.
- Ignoring Gain Settings: Setting gain too high causes distortion and heat.
- Rushing Panel Removal: Forcing clips breaks them and costs money to replace.
Take your time with each step. Rushing leads to errors that are hard to fix later. Double-check every connection before closing up. It is easier to fix a wire now than after reassembly.
Expert Insights for Better Sound
Professional installers have tricks to improve results. One tip is to use high-quality connectors. Soldered connections are often more reliable than crimped ones. If you crimp, use heat shrink tubing for extra protection.
Another insight is about wire routing. Keep audio wires away from power wires. Running them parallel can cause interference. If they must cross, have them cross at a ninety-degree angle. This minimizes electromagnetic interference.
Consider adding sound deadening material to the doors. Factory doors often resonate and muddy the sound. Adding damping material tightens the bass and improves clarity. This complements the extra power from your amplifier nicely.
Also, think about future upgrades. Leave extra wire length in the doors. This makes it easier to upgrade speakers later. You might want better speakers in the future. Having ready wiring saves effort down the road.
Key Takeaways
Installing an amplifier for your door speakers is a rewarding project. It enhances your daily driving experience significantly. You get louder volume and clearer details. Here are the main points to remember from this guide.
- Plan Your Route: Map out where wires will go before removing panels.
- Protect Your Wiring: Use loom and grommets to prevent damage from friction.
- Check Polarity: Ensure positive and negative match to keep sound phase correct.
- Secure Connections: Use quality connectors and tape to prevent shorts.
- Test Before Closing: Verify sound quality before reassembling door panels.
- Respect Power Limits: Match amplifier power to speaker capabilities to avoid damage.
- Safety First: Always disconnect the battery before working on car electronics.
With careful planning and execution, you can achieve professional results. Enjoy your upgraded audio system on your next drive.
Frequently Asked Questions
Do I need to replace my factory speakers to add an amp?
No, you do not need to replace them. You can wire an amplifier to drive your existing factory speakers. However, aftermarket speakers often handle more power and sound better.
Can I connect the amp directly to the battery?
Yes, you should run the main power wire directly from the battery. This ensures the amp gets enough current. Always install a fuse near the battery terminal for safety.
What happens if I wire the speakers out of phase?
If wired out of phase, the sound will seem weak and hollow. The bass response will disappear because the speakers cancel each other out. Check your positive and negative connections carefully.
Is it safe to tap into factory speaker wires?
Yes, it is generally safe if done correctly. Use splice connectors or a line output converter. Avoid cutting the factory wires completely so you can revert changes later.
How long does the installation take?
It depends on your car model and experience level. For a beginner, it might take three to five hours. Experienced installers can often finish in under two hours.
Will this void my car warranty?
It might affect audio-related warranty claims. However, it usually does not void the entire vehicle warranty. Keep all original parts so you can return the car to stock if needed.