Fix Laptop Dents
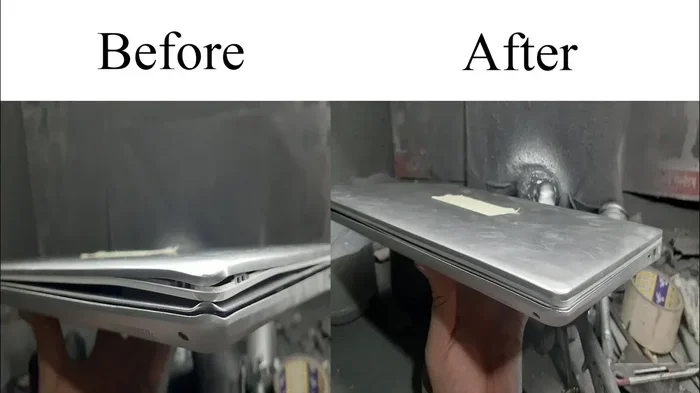
Fixing laptop dents is easier than most people think. With the right tools and a little patience, you can restore your laptop’s appearance without spending hundreds on repairs. This guide covers everything from minor surface dents to deeper indentations, giving you practical methods that really work.
Your laptop takes a beating. It gets tossed into bags, knocked off desks, and bumped against hard surfaces every single day. Over time, all that rough handling leaves behind unsightly dents that make your once-pristine device look worn and tired. Whether you have a tiny speckle on the lid or a deep indentation along the chassis, fixing laptop dents is something you can do yourself.
Many people immediately think they need to pay a technician or buy a whole new machine. But the truth is, most laptop dents respond well to simple home remedies. You do not need expensive tools or specialized training. With the right approach, you can make those dents disappear and bring back your laptop’s original look.
This guide walks you through every step of the process. We will cover how to evaluate the damage, what tools to gather, and several proven methods for removing dents. We will also share tips on preventing future damage and knowing when a professional is your best bet.
Key Takeaways
- DIY dent removal works: You can fix most laptop dents at home using simple tools like suction cups, heat, and compressed air.
- Assess the damage first: Knowing whether your dent is superficial or structural helps you choose the right repair method.
- Prevention is key: Simple habits like using a protective case can keep your laptop looking new for years.
- Know when to call a pro: Deep dents or damage near hinges and ports may need professional attention.
- Use gentle methods first: Start with the least invasive technique before trying anything that could cause more damage.
📑 Table of Contents
Why Laptops Get Dented
Understanding why dents happen helps you prevent them in the future. Laptops are portable by design, which means they travel with you everywhere. That mobility comes with risks.
Common Causes of Laptop Dents
- Dropping the laptop: Even a short fall onto a hard floor can leave a lasting mark. The corners and edges are the most vulnerable spots.
- Pressure from bags: When your laptop rattles around in a backpack or messenger bag, it presses against other items. Over time, this pressure creates dents, especially on the sides.
- Sitting on it: This one happens more than you would think. A laptop left on a couch or chair can get crushed under body weight.
- Desk bumps: Sliding your laptop across a desk or knocking it against a wall during a busy workday causes gradual damage.
- Manufacturing weaknesses: Some laptops have thinner chassis materials, particularly budget models. These are more prone to denting even with normal use.
The material your laptop is made from also plays a big role. Aluminum laptops dent more easily than plastic ones, but plastic laptops can crack instead. Each material requires a slightly different repair approach.
How To Assess Laptop Dent Damage
Before you start any repair, take a close look at the dent. Not all dents are created equal, and the method you choose depends on the type of damage.
Types of Laptop Dents
- Surface-level dents: These are shallow indentations where the outer finish is pushed in but the metal or plastic has not cracked. They are the easiest to fix.
- Moderate dents: These dents go deeper into the chassis. The material is deformed but still intact. You will need more effort to pull them out.
- Severe dents: These involve cracking, bending, or structural damage. The laptop may not close properly or may have loose components. Professional help is usually the safest route.
- Corner and edge damage: Corners absorb the most impact during drops. These dents are often the hardest to repair because the material is stretched and thinned.
Run your fingers around the dent gently. Check if any sharp edges have formed. Also look for cracks or gaps in the chassis. If the damage goes beyond a simple indentation, you should seriously consider professional repair options.
Tools and Materials You Will Need
Having the right tools ready before you start makes the process much smoother. You probably already own most of these items at home.
Essential Repair Kit
- Suction cup: A small suction cup works wonders for pulling out shallow dents. You can find them at any dollar store or auto shop.
- Hair dryer or heat gun: Heat softens plastic and metal, making dents more pliable. A standard hair dryer on high setting works great.
- Compressed air can: This is useful for certain techniques, especially with aluminum laptops where thermal expansion helps pop dents out.
- Rubber mallet or wooden spoon: For gentle tapping to push dents back into place from the inside.
- Plunger (small cup style): Similar to a suction cup but with more pulling power for deeper dents.
- Toothpick or thin plastic pick: Helpful for applying pressure to specific points without scratching the surface.
- Microfiber cloth: For cleaning the area before and after repair.
- Laptop protective sleeve: Essential for preventing future damage after your repair.
Before you begin, make sure your laptop is powered off and unplugged. Working on a cool device reduces the risk of accidental damage. Also, lay down a soft towel or mat to protect your laptop from further scratches during the repair process.
Step-by-Step Methods to Fix Laptop Dents
Now for the part you have been waiting for. Here are several proven methods to remove dents from your laptop. Start with the gentlest technique and move to more aggressive methods only if needed.
Method 1: The Heat and Cool Technique
This method works best for aluminum laptops with shallow to moderate dents. The principle is simple: heat expands the metal, and rapid cooling contracts it, often popping the dent back out.
- Heat the dented area with a hair dryer on high for about 30 to 60 seconds. Keep the dryer moving to avoid concentrating heat in one spot.
- Wrap a cloth around a can of compressed air and turn it upside down. Spray the dented area with the cold propellant.
- The rapid temperature change causes the metal to contract quickly, which may push the dent outward.
- Repeat the process two or three times if needed. Sometimes one round does the trick, but stubborn dents need a few attempts.
Pro tip: Do not hold the compressed air can upright when spraying. The propellant comes out extremely cold and can cause frostbite on your skin if it touches directly.
Method 2: Suction Cup Pull
The suction cup method is one of the most reliable ways to pull a dent out from the surface. It works well on both aluminum and plastic laptops.
- Clean the dented area thoroughly with a microfiber cloth. Any dust or grease will reduce the suction cup’s grip.
- Wet the rim of the suction cup slightly with water. This creates a better seal against the laptop surface.
- Place the suction cup directly over the center of the dent.
- Pull the suction cup handle gently but steadily. You should feel the dent starting to pop back into shape.
- If the first pull does not work, reposition the cup and try again. Sometimes angling the pull slightly helps.
This method takes patience. Do not yank the suction cup aggressively, as you risk scratching the laptop surface or damaging the suction cup itself.
Method 3: The Plunger Approach
A small cup-style plunger gives you more pulling force than a suction cup. This is ideal for deeper dents that resist gentler methods.
- Choose a plunger that is small enough to fit over the dent without covering too much surrounding area.
- Wet the plunger rim and press it firmly over the dent.
- Pull the plunger straight back with steady pressure. Do not angle it sideways.
- Check the result after each pull. You may need several attempts to fully remove the dent.
Important: Only use a clean plunger that has not been used in a bathroom toilet. Even if you wash it, using a dedicated repair plunger avoids any hygiene concerns.
Method 4: Gentle Tapping from Inside
If you can access the inside of the laptop near the dent, you can push the metal back from behind. This method works best for dents on the bottom or sides of the chassis.
- Remove the bottom panel of your laptop using the appropriate screwdriver.
- Locate the area behind the dent from the inside.
- Use a rubber mallet or the back of a wooden spoon to gently tap the metal from behind.
- Start with light taps and gradually increase pressure. You want to push the metal back into place, not make it worse.
- Check the outside frequently to monitor your progress.
This method requires care. If you are not comfortable opening your laptop, skip this method and try the external techniques first. Also, make sure you remember where all the screws go, as different screws may have different lengths.
Method 5: Boiling Water Trick for Plastic Laptops
Plastic laptops respond differently to heat than aluminum ones. Boiling water can soften the plastic enough to allow the dent to pop back out.
- Boil a pot of water and pour it slowly over the dented area. Use a ladle or spoon to control the pour.
- The heat softens the plastic. While it is still warm, press a cloth firmly against the dent and push it outward.
- Alternatively, place a towel over the dent and use your hands to apply even pressure.
- The plastic should spring back closer to its original shape as it cools.
Be careful with boiling water near any electronic components. Only use this method on the exterior body of the laptop, never near openings like ports or vents. Also, make sure your laptop is completely cool before applying heat to avoid warping the plastic.
Preventing Future Dents on Your Laptop
Once you have fixed those dents, you want to keep your laptop looking great. Prevention is always better than repair, and a few simple habits go a long way.
Daily Habits That Protect Your Laptop
- Use a padded laptop sleeve: A good sleeve cushions your laptop from bumps and pressure inside your bag. This single accessory prevents most transport-related dents.
- Keep it in a dedicated compartment: Store your laptop in a separate section of your bag away from keys, pens, and other hard objects that could press against it.
- Never place heavy items on top of your laptop: Sitting on your laptop or stacking books on it creates pressure points that lead to dents over time.
- Use a laptop stand or desk: Keeping your laptop on a stable surface reduces the chance of accidental drops and bumps.
- Clean your workspace: A clear desk means fewer objects your laptop can collide with during daily use.
If you have other laptop issues like a sticky or unresponsive touchpad, you can check out our guide on how to fix my laptop mouse pad for helpful troubleshooting tips. Similarly, if you are dealing with a cursor that jumps around or stops working, our article on how to fix your laptop mouse covers the most common causes and solutions.
Recommended Protective Accessories
| Accessory | Purpose | Price Range |
|---|---|---|
| Padded laptop sleeve | Cushions during transport | $10 – $30 |
| Hard shell case | Protects corners and edges | $20 – $50 |
| Laptop stand | Prevents desk bumps and falls | $15 – $40 |
| Screen protector film | Prevents scratches on lid | $5 – $15 |
| Keyboard cover | Keeps debris out of internals | $8 – $20 |
Investing in a few of these accessories can save you a lot of money on repairs down the road. A laptop sleeve alone can prevent most of the dents caused by daily transport.
For general laptop maintenance and troubleshooting, our article on how to fix computer running slow and freezing also covers common performance issues that laptop users face regularly.
When To Seek Professional Help
Not every dent should be handled at home. Some situations call for the expertise of a trained technician. Knowing the difference saves you from making the damage worse.
Signs You Need a Professional
- Cracked chassis: If the dent has caused a crack or split in the laptop body, a professional can properly bond and reinforce the material.
- Damage near hinges: Dents around the hinge area can affect how the screen opens and closes. A technician can repair this without compromising the hinge mechanism.
- Dents near ports: If a dent is close to USB, HDMI, or charging ports, it may have affected the internal connections. A professional can check for hidden damage.
- Persistent rattling or flexing: If your laptop feels loose or makes rattling sounds after you try to fix a dent, the internal frame may be damaged.
- Multiple deep dents: When your laptop has several dents in different areas, a professional can assess whether the structural integrity is compromised.
Professional repair costs vary widely depending on the damage and your laptop model. Simple cosmetic dent repair might cost $50 to $150, while structural repairs can run higher. Always get a quote before committing to any repair service.
Final Thoughts on Fixing Laptop Dents
Fixing laptop dents does not have to be stressful or expensive. Most dents respond well to simple home methods using tools you already own. The key is to assess the damage first, choose the right method for your laptop material, and work patiently and gently.
Prevention plays a huge role too. A good laptop sleeve and careful handling habits can keep your device looking brand new for years. And when home methods are not enough, professional repair services are always a reliable fallback.
Take pride in your laptop. It is a tool you rely on every day, and keeping it in good shape reflects how much you value your investment. Start with the gentlest method, work your way up if needed, and enjoy the satisfaction of a dent-free laptop.
Frequently Asked Questions
Can I use a vacuum cleaner to remove laptop dents?
Yes, a vacuum cleaner with a narrow nozzle can sometimes help pull out shallow dents. Place the nozzle over the dent and turn on the vacuum. The suction may draw the dent outward. However, be careful not to scratch your laptop with the nozzle, and this method works best on smooth surfaces without textured finishes.
Will fixing a dent void my laptop warranty?
It depends on your warranty terms and the method you use. DIY cosmetic repairs like dent removal usually do not void the warranty unless you accidentally cause additional damage. However, if you open the laptop chassis and the warranty sticker is broken, it may be considered void. Check your warranty documentation or contact the manufacturer before attempting any repairs.
What is the best method for fixing dents on an aluminum laptop?
The heat and cool technique works best for aluminum laptops. Aluminum responds well to thermal expansion and contraction. The suction cup method is also effective for aluminum surfaces. Avoid using excessive force or sharp tools, as aluminum dents more easily than other materials and can scratch easily during repair attempts.
How much does professional laptop dent repair cost?
Professional laptop dent repair typically costs between $50 and $200 depending on the severity and location of the dent. Simple surface dents are on the lower end, while deep dents or those near structural components cost more. Always get a quote from a reputable repair shop before proceeding, and compare prices from at least two or three providers.
Can I prevent my laptop from getting dented in the future?
Absolutely. The best prevention is using a padded laptop sleeve whenever you transport your device. Avoid placing heavy objects on top of your laptop, and be mindful of where you set it down. A hard shell case offers extra protection for the corners and edges, which are the most common spots for dents to occur.
Is it safe to use a hair dryer on my laptop during dent repair?
Yes, it is safe as long as you keep the hair dryer moving and do not concentrate heat on one spot for too long. Use a medium to low heat setting and hold the dryer at least six inches away from the surface. Never use a hair dryer while the laptop is powered on or plugged in, and make sure the laptop is cool before starting the repair process.