Upgrading your laptop’s RAM is one of the most cost-effective ways to improve performance. This guide walks you through every step, from checking compatibility to installing new modules safely. Follow these instructions to breathe new life into your laptop without professional help.
How to Add More Ram to Laptop
Is your once-speedy laptop now struggling to keep up? Do you see the spinning wheel of death more often than your desktop? Before you start shopping for a new machine, there’s a powerful and often overlooked upgrade that can dramatically improve performance: adding more RAM. Random Access Memory (RAM) is your laptop’s short-term memory, where data is stored for quick access by the processor. When you run out of it, your system slows to a crawl as it swaps data to the much slower hard drive or SSD. Learning how to add more ram to laptop is a valuable skill that can save you money and extend the useful life of your computer by years. This comprehensive guide will take you from a curious beginner to a confident DIY upgrader, covering everything from initial checks to final verification.
The process is less intimidating than you might think. For many laptops, it involves little more than unscrewing a panel, swapping out a small stick or two of memory, and screwing the panel back on. However, the key to success lies in the preparation. Rushing into an upgrade without verifying compatibility can lead to wasted money and a non-booting laptop. We’ll break down each phase into clear, actionable steps, using plain language and practical examples. Whether you have a business-class Dell Latitude, a consumer HP Pavilion, or a sleek ultrabook, this guide will help you determine if an upgrade is possible and, if so, how to execute it flawlessly.
Key Takeaways
- Check compatibility first: Not all laptops support RAM upgrades. Verify your model’s maximum RAM, available slots, and supported type (DDR4/DDR5) before purchasing anything.
- Buy the correct RAM: Match the memory type, speed (MHz), and capacity to your laptop’s specifications. Using incompatible RAM can prevent booting or cause instability.
- Prioritize safety: Always power off, unplug, and remove the battery (if possible). Use an anti-static wrist strap and work on a non-conductive surface to avoid component damage.
- Follow a model-specific guide: Disassembly varies by brand and model. Search for your exact laptop’s service manual or a trusted video tutorial to avoid damaging clips or cables.
- Verify after installation: Enter BIOS/UEFI or check your operating system’s system information to confirm the new RAM is recognized and running at the correct speed.
- Know when to seek help: If your laptop has soldered RAM, requires complex disassembly, or you’re uncomfortable with the process, consider a professional upgrade service.
- Upgrade strategically: For most users, 16GB is the modern sweet spot for multitasking and general use. Power users (video editing, 3D rendering) should consider 32GB or more.
📑 Table of Contents
- Understanding RAM and Its Critical Role in Laptop Performance
- Pre-Upgrade Checklist: Is Your Laptop Even Upgradeable?
- Selecting the Right RAM: Quality, Capacity, and Brand
- Essential Tools and Safety Precautions: Don’t Skip This!
- Step-by-Step: Installing Your New RAM Module(s)
- Post-Installation Verification: Did It Work?
- Maximizing Your Laptop’s Performance After the Upgrade
- When an Upgrade Isn’t Possible: Alternative Solutions
- Conclusion: Your Laptop’s New Lease on Life
Understanding RAM and Its Critical Role in Laptop Performance
Before diving into screwdrivers and service panels, it’s essential to understand what RAM is and why more of it can transform your computing experience. Think of your laptop’s RAM as a workspace on your desk. The larger the desk, the more documents, books, and tools you can have out and ready to use without constantly getting up to fetch something from a filing cabinet (your storage drive). When your workspace (RAM) is full, you waste time shuffling things in and out. More RAM means a larger, more efficient workspace.
What is RAM and How Does It Work?
RAM is a type of volatile memory, meaning it loses all stored data when the power is turned off. Its sole purpose is to provide the CPU (Central Processing Unit) with ultra-fast access to the data and instructions it needs right now for active applications and the operating system. Every program you open—from your web browser with a dozen tabs to a word processor—loads some of its data into RAM. The more programs you run simultaneously, the more RAM you consume. When physical RAM is exhausted, your operating system uses a portion of your SSD or hard drive as “virtual memory” or a swap file. While this allows you to open more apps, it’s orders of magnitude slower than real RAM, leading to the frustrating lag and stuttering you experience.
Clear Signs Your Laptop is Starving for More RAM
How do you know if slow performance is due to insufficient RAM rather than an aging CPU or a full hard drive? Look for these telltale symptoms:
- Constant Hard Drive Activity: If you hear your laptop’s storage drive chattering or see its activity LED blinking almost continuously during normal use, it’s a classic sign of heavy swapping.
- System Slowdown with Multiple Apps: Performance is fine with one or two programs but tanks noticeably when you have a browser, a document, and a music player all open.
- “Not Responding” Messages: Applications frequently freeze and show “Not Responding,” requiring you to close them or wait for recovery.
- Slow Program Launching: Even simple applications take an unusually long time to open from a cold start.
- Task Manager/Activity Monitor Alerts: In Windows, press Ctrl+Shift+Esc to open Task Manager. Go to the “Performance” tab and click “Memory.” If you see consistently high usage (above 80-90%) and the “Hard Faults/sec” counter is nonzero and active, your system is thrashing. On macOS, use Activity Monitor’s Memory tab and look for “Swap Used.”
If these symptoms sound familiar, a RAM upgrade is a likely and effective cure. It’s often the single best performance-per-dollar upgrade you can make to an older laptop.
Pre-Upgrade Checklist: Is Your Laptop Even Upgradeable?
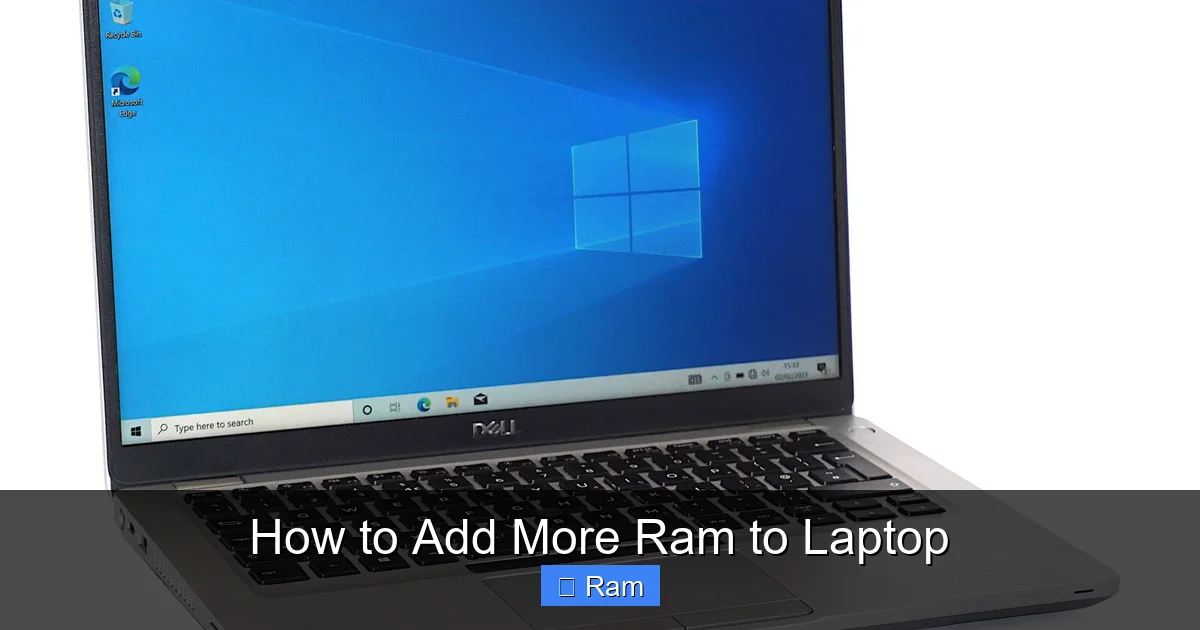
This is the most crucial step. The unfortunate truth is that not all laptops allow for RAM upgrades. Over the past decade, manufacturers have increasingly soldered memory directly onto the motherboard to save space and reduce costs, especially in ultra-thin and ultra-light designs. Before you buy a single stick of RAM, you must confirm your laptop supports user-upgradable memory.
Visual guide about How to Add More Ram to Laptop
Image source: robots.net
How to Check Your Laptop’s Specifications
You need to find three key pieces of information: the total maximum RAM your laptop supports, the type of RAM it uses (DDR3, DDR4, DDR5, LPDDR, etc.), and the number of available slots. Here’s how to find this information:
- Check the Manufacturer’s Website: This is the most reliable method. Go to the support page for your specific laptop model (e.g., Dell XPS 13 9310, HP Spectre x360 14, Lenovo ThinkPad T14 Gen 3). Look for the “Specifications” or “Technical Specifications” sheet. Search for terms like “Memory,” “RAM,” “Memory Max,” or “Upgradable Memory.” It will often state the maximum supported RAM and the number of slots. For example, it might read “16GB, 1 SODIMM Slot” or “32GB, 2 SODIMM Slots (Soldered + 1 Slot).”
- Use System Information Tools: On Windows, press Win+R, type msinfo32, and hit Enter. The “Installed Physical Memory (RAM)” tells you what’s currently installed, but not the max. For more detail, use a free tool like CPU-Z. Go to the “Memory” and “SPD” tabs to see type, size, and slot information. On macOS, click the Apple menu > About This Mac > Memory. It will show the current configuration and sometimes the maximum supported. On Linux, use the command sudo dmidecode -t memory in the terminal.
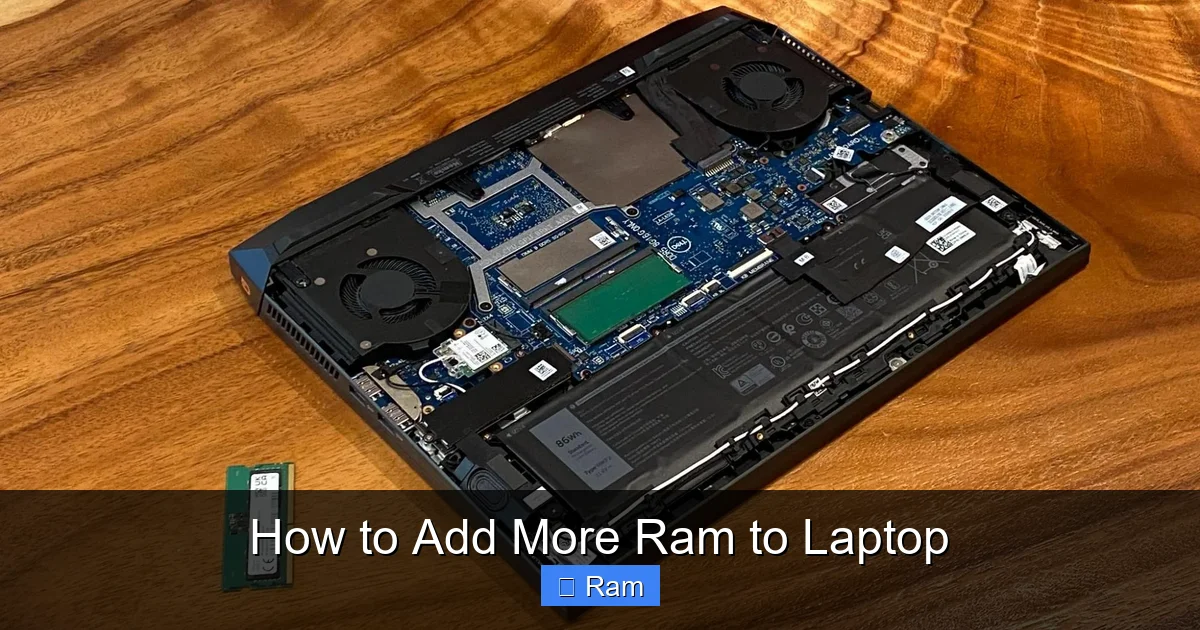
- Physical Inspection (If Possible): If your laptop has a bottom access panel (often held by 10-12 screws), you can power it off, unplug, remove the battery (if easily accessible), and carefully remove the panel. Look for the RAM modules. If you see one or two slots with clips on either side and no other components obstructing them, you have upgradeable RAM. If you see no slots or the RAM modules are hidden under other parts like the keyboard or motherboard, it’s likely soldered or very difficult to access.
Decoding RAM Specifications: Type, Speed, and Configuration
Once you know your laptop is upgradeable, you must match the new RAM perfectly.
- Type (DDR Generation): DDR (Double Data Rate) memory is not backward or forward compatible. DDR3, DDR4, and DDR5 have different notches and pin counts. You must buy the exact type your laptop supports. DDR4 is most common in laptops from ~2015-2020, while DDR5 is in newer models (2021+). LPDDR (Low Power DDR) is almost always soldered and not user-upgradable.
- Form Factor: Laptops use SODIMM modules, which are smaller than the DIMMs used in desktops. Ensure you buy SODIMM.
- Speed (MHz): RAM is rated in megahertz (e.g., 2666MHz, 3200MHz). Your laptop will run RAM at the speed of its slowest module or the maximum supported by its chipset. It’s generally safe to install faster RAM; it will simply run at the lower speed your system supports. However, for optimal performance, match the speed of your existing RAM if adding to it.
- Capacity per Module: Check the maximum capacity per slot. Some older chipsets limit each slot to 8GB or 16GB, even if the total max is higher.
- Dual-Channel vs. Single-Channel: For best performance, if your laptop has two slots, install identical RAM modules (same size, type, speed) in both to enable dual-channel mode, which doubles the data throughput between RAM and CPU. If you have one slot occupied and one free, buying a single matching stick is fine and will run in single-channel mode until you add a second matching stick.
Selecting the Right RAM: Quality, Capacity, and Brand
With your laptop’s specs in hand, it’s time to shop. The RAM market is vast, but focusing on compatibility narrows it down quickly.
Visual guide about How to Add More Ram to Laptop
Image source: cdn.mos.cms.futurecdn.net
How Much RAM Do You Actually Need?
Capacity is the most straightforward spec. Here’s a practical guideline for modern use:
- 8GB: The absolute bare minimum for Windows 11/macOS today. Acceptable only for very light web browsing, document editing, and streaming. Multitasking will quickly fill it.
- 16GB: The sweet spot for most users. Comfortably handles dozens of browser tabs, office applications, media playback, and light photo editing. This is the recommended upgrade target for the vast majority of laptops.
- 32GB: The new standard for power users, gamers, and professionals. Ideal for running virtual machines, heavy-duty video editing, 3D rendering, large datasets in Excel, and keeping everything open while working.
- 64GB+: For extreme workloads: professional video editors working with 8K footage, scientists running massive simulations, or users with dozens of heavy applications open simultaneously. Overkill for general use.
Consider your primary tasks. If you’re a student or office worker, 16GB is a massive improvement over 8GB. A gamer or content creator should aim for 32GB if the budget allows. Always check your laptop’s maximum supported RAM first—there’s no point buying 64GB if your system maxes out at 32GB.
Brands, Timing, and Voltage
Stick with reputable brands like Crucial (by Micron), Kingston, Corsair, G.Skill, or Samsung. They offer reliable modules with lifetime warranties. Crucial’s website has an excellent system scanner tool that automatically detects your laptop’s compatible RAM, which is a great starting point.
- Timing (CL): CAS Latency (CL) is a timing number (e.g., CL16, CL18). Lower is slightly faster, but the impact on real-world laptop performance is minimal compared to capacity and speed. Don’t overpay for ultra-low latency laptop RAM.
- Voltage: Standard DDR4 SODIMMs run at 1.2V. Some high-performance kits run at 1.35V. Your laptop’s chipset will dictate the supported voltage. Most standard kits are 1.2V and are universally compatible.
- Heat Spreaders: Laptop RAM modules are low-power and don’t generate much heat. Fancy heat spreaders are mostly for aesthetics and add thickness, which can sometimes interfere in tight laptop chassis. A standard, low-profile stick is usually best.
Pro Tip: If you’re adding RAM to an existing module, try to buy a kit that’s from the same manufacturer and has identical specs (size, speed, timing) to ensure the best compatibility and dual-channel performance.
Essential Tools and Safety Precautions: Don’t Skip This!
Rushing into the physical upgrade without proper preparation is the fastest way to damage your laptop. A few minutes of setup can prevent a costly mistake.
Visual guide about How to Add More Ram to Laptop
Image source: robots.net
The Toolkit You’ll Need
Gather these items before you start:
- Appropriate Screwdrivers: Most laptops use Phillips-head screws (#00 or #000 is common). A precision screwdriver set is ideal. Some newer models use Torx screws (T5, T6).
- Plastic Pry Tools or Spudger: For gently prying open plastic clips without scratching the chassis. You can often use a old credit card in a pinch.
- Anti-Static Wrist Strap (Highly Recommended): This grounds you to the laptop’s chassis, preventing static electricity from discharging into sensitive components. If you don’t have one, periodically touch an unpainted metal part of the laptop’s chassis (like a port screw) to discharge static.
- Small Container or Magnetic Mat: To hold screws safely. Laptop screws are tiny and easy to lose.
- Good Lighting: A desk lamp or flashlight helps you see small clips and connectors.
- Your New RAM Module(s): Keep it in its anti-static bag until installation.
Creating a Safe Workspace
Choose a clean, flat, well-lit surface. Avoid carpeted areas, as they generate static. Lay down a non-conductive surface like a large cotton towel or a wooden table. Before touching any internal components, wash your hands to remove oils and dust. The goal is to minimize any risk of electrostatic discharge (ESD) or physical damage.
The Critical Safety Sequence
- Power Down Completely: Shut down your laptop through the operating system. Do not just put it to sleep or hibernate.
- Unplug Everything: Disconnect the AC adapter, any external monitors, USB devices, and peripherals.
- Remove the Battery (If Removable): This is the single most important safety step. If your laptop has a removable bottom cover that gives access to a battery, remove it. If the battery is internal and glued or soldered, you must be extremely careful. For many modern laptops with internal batteries, simply disconnecting the internal battery connector (if you can safely access it) is ideal. If you cannot or are unsure, proceed with extreme caution, ensuring the laptop is completely disconnected from any power source.
- Press the Power Button: After removing the battery and AC adapter, hold the laptop’s power button for 10-15 seconds. This drains any residual power from the capacitors on the motherboard.
Only after completing this sequence should you begin opening the chassis.
Step-by-Step: Installing Your New RAM Module(s)
Now for the main event. The exact process varies by laptop model, but the fundamental principles are the same. We’ll cover the general case for a laptop with a bottom access panel and standard SODIMM slots. Always consult a service manual for your specific model first. A quick search for “[Your Laptop Brand and Model] disassembly guide” on YouTube will often yield excellent visual references.
Step 1: Gaining Access to the RAM Compartment
Place your laptop upside-down on your prepared workspace. Locate the bottom cover. It is typically secured by multiple screws around the perimeter. Some screws may be hidden under rubber feet or plastic covers. Carefully remove all screws. Keep them organized by location; some may be different lengths. Gently pry around the edges of the cover with a plastic tool. The cover is held by plastic clips. Start at one corner and work your way around. It may “pop” audibly as clips release. Be patient and gentle—forcing it can crack the plastic. Once all clips are free, lift the cover off and set it aside.
Step 2: Locating and Removing Existing RAM
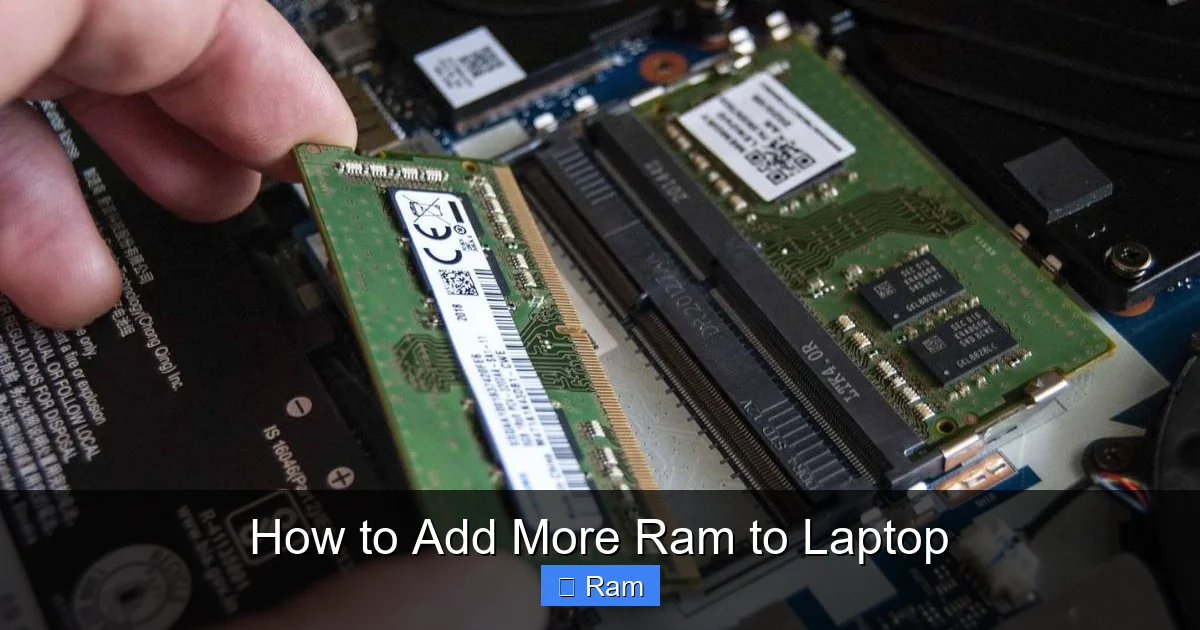
Inside, you should see one or two small, flat circuit boards (the SODIMMs) held at an angle by small metal clips on either side. They are usually easy to spot. To remove a module:
- Gently push the two metal retaining clips outward (away from the RAM module). They will pivot and release the module.
- The module will pop up at an angle (usually about 30-45 degrees).
- Grasp the module by its edges and pull it straight out. Do not touch the gold contacts or the circuitry on the module. Hold it by the sides.
- If you are replacing all modules, set the old ones aside in an anti-static bag for safekeeping or disposal.
Important Note: If your laptop has only one slot occupied and you are adding a second module, leave the existing one in place for now. Install the new one in the empty slot first, then address the old one if you plan to remove it.
Step 3: Installing the New RAM Module(s)
Installation is the reverse of removal, but alignment is key.
- Hold the new RAM module by the edges. Identify the notch on the bottom edge (the gold contacts). This notch is not centered; it is offset and must align perfectly with a raised protrusion in the slot.
- Hold the module at the same angle (about 30-45 degrees) that the old one popped up to.
- Align the notch with the key in the slot and gently but firmly insert the module into the slot. The contacts should disappear into the slot. Do not force it. If it doesn’t go in easily, the notch is misaligned. Pull it out and try again.
- Once fully inserted, press down on the top edge of the module until the two retaining clips snap back into place, locking the module flat against the motherboard. You should hear/feel two small clicks. Ensure the module is seated evenly and the clips are fully engaged.
If installing two modules, install one in each slot. For dual-channel performance, if you have two identical new modules, install them in the recommended slots (often color-coded, like A2/B2; consult your manual if unsure).
Step 4: Reassembly and First Boot
Double-check that nothing is loose inside and that no tools or screws are left behind. Carefully place the bottom cover back on, aligning it with the screw holes. Press firmly around the edges to ensure all plastic clips snap back into place. Reinstall all screws, ensuring they are snug but not overtightened (which can strip the plastic threads).
If you removed the battery, reinstall it now. Flip the laptop over. Connect the AC adapter but do not connect any other peripherals yet. Power on the laptop. It may reboot once or twice as it recognizes the new memory—this is normal. Listen for any unusual beeps (a series of beeps on startup often indicates a hardware error like unrecognized RAM). If it boots to your login screen normally, you’re in good shape.
Post-Installation Verification: Did It Work?
Don’t assume the upgrade worked just because your laptop turned on. You must verify that the operating system sees all the installed RAM and that it’s running at the correct speed.
Checking RAM in Your Operating System
Windows: Right-click the Start button and select “Task Manager.” Click the “Performance” tab, then select “Memory” from the left pane. At the top right, you’ll see the total “In use (GB)” and “Available (GB),” but more importantly, at the bottom, it shows “Speed” (e.g., 3200 MHz), “Form factor” (SODIMM), and “Hardware reserved” memory. The “Speed” should match your new RAM’s rating or your system’s supported speed. Also, go to Settings > System > About. Under “Device specifications,” it should list the “Installed RAM” correctly (e.g., 16.0 GB).
macOS: Click the Apple menu > About This Mac. The “Memory” line will show the total installed RAM (e.g., 16 GB 2666 MHz DDR4). If it shows the correct total, the upgrade was successful.
Linux: Open a terminal and use the command free -h. The “total” row under “Mem:” will show your total RAM. For detailed info, use sudo dmidecode -t memory.
Running a Memory Diagnostic Test
To ensure the new RAM is stable and free of errors, run a memory test. Windows has a built-in tool: search for “Windows Memory Diagnostic,” run it, and choose “Restart now and check for problems.” It will reboot and run a test, which can take 10-30 minutes. For a more thorough, advanced test, download and boot from the USB version of Memtest86+. It’s the gold standard for RAM testing and will run for several passes, reporting any errors. Zero errors indicate a healthy module. One or two errors might be a flaky module or a compatibility issue.
Common Post-Upgrade Issues and Solutions
- Laptop won’t boot (no power, no lights): Unlikely if you simply added RAM, but possible if you disturbed a cable. Re-seat the RAM modules. Ensure they are fully locked in place by the clips. Disconnect and reconnect the battery cable if you had to access it.
- Laptop powers on but shows a black screen or beeps: This is a classic sign of RAM incompatibility or poor seating. Power off, open the case, and firmly re-seat the modules. Try booting with only the new module(s) installed, removing the old ones. If it works with the new ones alone, the old module may be faulty or incompatible with the new one.
- RAM is not fully recognized (e.g., you installed 16GB but OS shows 15.9GB): This is normal. A portion of RAM is always reserved for hardware (graphics, etc.). A difference of 100-500MB is expected. A difference of several GB indicates a problem.
- System is unstable or crashes: Run a memory diagnostic. If errors appear, the RAM may be defective. Try the modules one at a time in each slot to isolate a bad stick or a bad slot. Ensure you haven’t exceeded the motherboard’s maximum supported speed or capacity.
Maximizing Your Laptop’s Performance After the Upgrade
You’ve successfully installed more RAM. Now, ensure your system is configured to use it effectively. First, check your power plan. In Windows, go to Control Panel > Power Options. Select the “High performance” plan or create a custom plan that ensures the processor state is set to 100% on both minimum and maximum. This prevents the CPU from throttling unnecessarily. Second, if you did a clean install of the RAM, your system should automatically use it. There’s no driver to install for standard DDR RAM. However, if you have a gaming laptop with advanced performance controls, check the manufacturer’s software (e.g., Alienware Command Center, MSI Dragon Center) to ensure memory settings are optimal. Finally, take a moment to appreciate the difference. Open all the applications you usually keep closed due to performance concerns. Experience the joy of seamless switching between a browser with 50 tabs, a spreadsheet, a video call, and a music player. That’s the tangible benefit of your new RAM.
When an Upgrade Isn’t Possible: Alternative Solutions
What if your research revealed your laptop has soldered, non-upgradeable RAM? Don’t abandon hope just yet. There are still performance-boosting steps you can take, ordered by cost-effectiveness:
- Upgrade to a Faster SSD: If your laptop still has a mechanical hard drive (HDD), replacing it with a SATA or NVMe SSD (if your laptop supports it) is the second-best upgrade after RAM. It will make booting, launching apps, and loading files dramatically faster.
- Clean Install of the Operating System: Over years, operating systems accumulate bloat. A clean install of Windows/macOS/Linux on your existing SSD can feel like getting a new machine, removing clutter and resetting services.
- Manage Startup Programs: Disable unnecessary applications from launching at startup. This frees up RAM and CPU cycles immediately upon boot.
- Adjust Virtual Memory: If you can’t add physical RAM, ensure your system has enough virtual memory (page file) set. Let Windows manage it automatically, or set a custom size (1.5x to 3x your physical RAM) on your SSD.
- Consider a Cloud PC or External GPU: For extreme needs, cloud computing services (like Shadow, Parsec) can offload processing. An external GPU (eGPU) via Thunderbolt can boost graphics performance, but it’s an expensive solution.
- Ultimately, a New Laptop: If your laptop is very old, has a slow dual-core CPU, and non-upgradeable RAM, the money might be better saved toward a new, more capable system that will last several more years.
Conclusion: Your Laptop’s New Lease on Life
Learning how to add more ram to laptop is an empowering skill that bridges the gap between user and machine. It demystifies a core component of computing and puts the power of performance enhancement directly in your hands. The journey, from careful research to the satisfying click of a new RAM module locking into place, is straightforward when you follow the methodical approach outlined here. Remember the golden rule: compatibility is king. A $200 RAM kit is a terrible investment if it doesn’t work in your system. Invest time in the pre-upgrade checklist, use reputable sources for information, and don’t rush the physical installation. The reward is a tangible, immediate improvement in how your laptop feels and performs. That sluggishness you’ve tolerated? It can become a thing of the past. Your upgraded laptop will handle more tasks, run applications more smoothly, and feel rejuvenated. So, open that service manual, order the right memory, and give your trusted companion the upgrade it deserves.
Frequently Asked Questions
Can I add RAM to any laptop?
No. Many modern ultrabooks and some mainstream laptops have the RAM soldered directly to the motherboard, making it impossible to upgrade. You must check your specific model’s specifications to see if it has accessible SODIMM slots.
How much RAM do I need for optimal performance in 2024?
For most users, 16GB is the ideal target, offering smooth multitasking with dozens of browser tabs and several applications open. Gamers and content creators should aim for 32GB. 8GB is only suitable for very light, single-task use on modern operating systems.
Will upgrading my laptop’s RAM void its warranty?
It depends on the manufacturer’s policy. Some brands (like Dell, Lenovo, HP) allow user-upgradable RAM without voiding the warranty, as it’s considered a user-serviceable part. However, if you damage something during installation, that damage won’t be covered. Always check your warranty terms first. Laptops with non-removable bottom panels often have warranties that consider any opening as voiding coverage.
What should I do if my laptop has soldered RAM and I need more memory?
If the RAM is soldered, a physical upgrade is impossible. Your best alternatives are to (1) upgrade to a faster SSD if you have a hard drive, (2) perform a clean operating system install, (3) aggressively manage startup programs and browser tabs, or (4) save for a new laptop with upgradeable or higher-capacity memory.
Do I need to install RAM in matching pairs?
For optimal performance in dual-channel mode (which doubles memory bandwidth), you should install identical RAM modules (same size, type, speed, and manufacturer) in both slots. However, you can install a single module in a multi-slot laptop; it will simply run in single-channel mode. Mixing unmatched modules usually works but may run in single-channel mode and can sometimes cause instability.
How can I confirm that the RAM upgrade was successful?
After booting, check your operating system’s system information. In Windows, use Task Manager (Performance > Memory) or Settings > System > About. On macOS, use About This Mac. The total “Installed RAM” should match your new configuration. For a deeper check, run the Windows Memory Diagnostic or Memtest86+ to ensure there are no errors.