How to Wire 4 Speakers to 2 Channel Amp

Connecting four speakers to a two‑channel amplifier is simple once you understand series, parallel, and bridged wiring. This guide walks you through the tools you need, wiring methods, and troubleshooting tricks so you can enjoy full‑range audio without damaging your gear. Follow the clear diagrams and practical tips to get perfect sound every time.
Key Takeaways
- Know your amp’s rating: Matching impedance prevents overheating and distortion.
- Series vs. parallel: Choose the wiring style that keeps the total load within safe limits.
- Bridging can double power: Only bridge if your amp and speakers support the required impedance.
- Use quality gauge wire: Thicker wire reduces loss and protects against short circuits.
- Test before finalizing: Check continuity and polarity to avoid phase issues.
- Secure connections: Properly crimped or soldered terminals ensure long‑term reliability.
- Safety first: Always disconnect power before wiring or adjusting connections.
📑 Table of Contents
- Introduction: Why Wire Four Speakers to a Two‑Channel Amp?
- Understanding Impedance and Load Calculations
- Wiring Options for Four Speakers
- Tools and Materials You’ll Need
- Step‑by‑Step Wiring Guide
- Practical Tips and Common Mistakes
- When to Bridge Your Two‑Channel Amp
- Testing and Fine‑Tuning Your System
- Conclusion: Get the Most Out of Your Two‑Channel Amp
Introduction: Why Wire Four Speakers to a Two‑Channel Amp?
Most car‑audio enthusiasts start with a two‑channel amp because it’s affordable and easy to install. But what happens when you want to fill a larger cabin with richer, fuller sound? Adding more speakers is the answer, and you don’t always need a bigger amp. By wiring four speakers to a two‑channel amp correctly, you can achieve balanced audio, save space, and keep your budget in check.
In this article we’ll break down the fundamentals—impedance, wiring configurations, and safety—before moving on to step‑by‑step instructions. Whether you’re a first‑time DIYer or a seasoned installer, the tips and examples here will help you avoid common pitfalls and get the most out of your system.
Understanding Impedance and Load Calculations
What Is Impedance?
Impedance, measured in ohms (Ω), is the resistance a speaker offers to the amp’s electrical signal. Most car speakers are rated at 4 Ω, while some aftermarket models use 2 Ω or 8 Ω. Your amp will list a “minimum load” rating—usually 2 Ω, 4 Ω, or 8 Ω per channel.

Visual guide about How to Wire 4 Speakers to 2 Channel Amp
Image source: publicdomainpictures.net
Why Load Matters
If the total load is too low (e.g., 1 Ω), the amp will overheat and may shut down or get damaged. If the load is too high (e.g., 16 Ω), you’ll lose power and volume. The goal is to keep the combined speaker impedance within the amp’s safe operating range.
Calculating Load for Four Speakers
Use these simple formulas:
- Series: Add the ohms together (Ω₁ + Ω₂ + …).
- Parallel: 1 ÷ (1/Ω₁ + 1/Ω₂ + …).
Example: Four 4 Ω speakers wired in parallel give 1 Ω total—dangerously low for most amps. Wiring them in series results in 16 Ω, which is too high. The sweet spot is often a mixed series‑parallel arrangement that lands at 4 Ω total.
Wiring Options for Four Speakers
Option 1: Two Sets of Parallel Speakers (One Set per Channel)
Connect two speakers in parallel to the left channel and the other two in parallel to the right channel. This keeps each channel at 2 Ω (if using 4 Ω speakers) and is safe for most 2‑channel amps that support a 2 Ω load.

Visual guide about How to Wire 4 Speakers to 2 Channel Amp
Image source: enigmaperu.com
Option 2: Series‑Parallel (aka “Bridge‑Ready” Wiring)
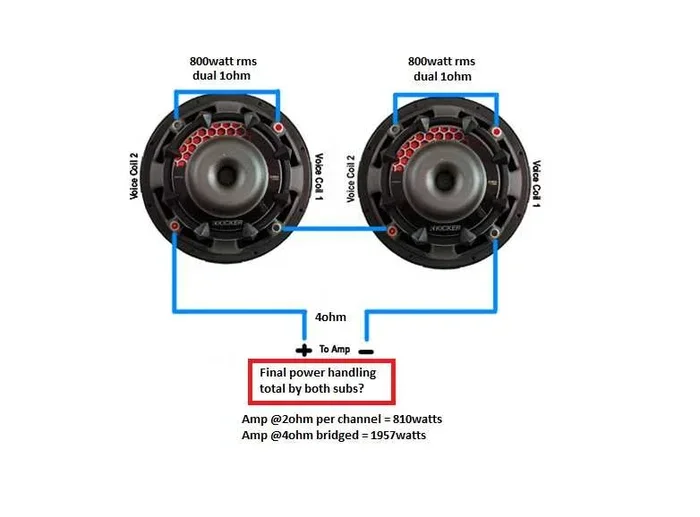
If your amp can handle a 4 Ω load when bridged, wire each pair of speakers in series, then bridge the amp. Each series pair will be 8 Ω, and the bridged amp sees 4 Ω total—perfect for high‑power output.
Option 3: Bi‑Aural Wiring (Separate Front/Rear Zones)
Use a crossover or a simple speaker selector to send front speakers to channel 1 and rear speakers to channel 2. This gives you independent volume control for each zone, ideal for home‑theater or custom car installs.
Tools and Materials You’ll Need
Essential Tools
- Wire stripper/cutter
- Crimping tool or soldering iron
- Multimeter (for continuity and resistance checks)
- Torque screwdriver (for secure terminal bolts)
Recommended Materials
- 16‑18 AWG speaker wire (oxygen‑free copper for best conductivity)
- Heat‑shrink tubing or electrical tape
- Speaker terminal connectors (banana plugs or spade lugs)
- Fuse holder and appropriate fuse (usually 30 A for a 2‑channel amp)
Step‑by‑Step Wiring Guide
Step 1: Plan Your Layout
Sketch a quick diagram showing where each speaker will sit and which wiring method you’ll use. Mark the amp’s left and right channels, and decide if you’ll bridge the amp.
Step 2: Disconnect Power
Always unplug the battery or turn off the vehicle’s fuse panel. This prevents accidental shorts and protects both you and the equipment.
Step 3: Measure Speaker Impedance
Use a multimeter to confirm each speaker’s rated impedance. Some “dual‑voice‑coil” speakers have separate coils that can be wired differently for flexibility.
Step 4: Cut and Strip Wire
Measure the distance from each speaker to the amp, add a few extra inches for slack, and cut the appropriate length. Strip about ½ inch of insulation from each end.
Step 5: Connect Speakers (Parallel Example)
- Take two 4 Ω speakers for the left channel.
- Twist the positive (+) leads together and the negative (–) leads together.
- Attach the combined positive lead to the amp’s left‑channel positive terminal, and the combined negative to the left‑channel negative terminal.
- Repeat for the right channel with the remaining two speakers.
Step 6: Secure Connections
Crimp or solder the wire ends to the speaker terminals. Slide heat‑shrink tubing over each joint and apply heat to seal it. This protects against moisture and vibration.
Step 7: Install a Fuse
Place a fuse on the positive power wire within 18 inches of the amp. Choose a rating that matches the amp’s current draw—usually 30 A for a 2‑channel, 50 W per channel unit.
Step 8: Test Continuity and Polarity
Set the multimeter to “continuity” and verify each speaker’s positive and negative paths are correct. Also check that the two speakers on each channel are in phase; reversed polarity will cause thin, hollow sound.
Step 9: Power Up and Adjust
Reconnect the battery, turn on the amp, and play a familiar track. Start with low gain settings and increase gradually while listening for distortion. Fine‑tune crossover points if your amp has built‑in controls.
Practical Tips and Common Mistakes
Tip 1: Match Wire Gauge to Length
Long runs (over 10 ft) benefit from 14 AWG wire to reduce resistance loss. Short runs can use 16 AWG safely.
Tip 2: Keep Positive and Negative Separate
Run the positive and negative wires on opposite sides of the vehicle’s chassis to avoid electromagnetic interference.
Mistake to Avoid: Ignoring the Amp’s Minimum Load
Never wire four 4 Ω speakers in pure parallel (1 Ω total). This will overheat the amp within seconds. Always calculate the total load first.
Tip 3: Use a Crossover for Better Sound
Even a simple passive crossover can protect tweeters and improve overall clarity. It’s especially useful when you bridge the amp.
Helpful Resource
For a broader view of speaker‑to‑amp connections, check out our detailed guide on how to wire speakers to amp. It covers additional wiring scenarios and troubleshooting steps.
When to Bridge Your Two‑Channel Amp
Understanding Bridging
Bridging combines the left and right channels into a single, more powerful channel. This is ideal when you need extra wattage for a pair of speakers or a subwoofer.
Bridge‑Ready Impedance
Most bridgable amps require a minimum of 4 Ω per channel when bridged. Using the series‑parallel method (two speakers in series per channel) yields exactly that.
Bridge Wiring Steps
- Set the amp to “bridge” mode (refer to the manual).
- Connect the positive terminal of the left channel to the positive speaker lead, and the negative terminal of the right channel to the negative speaker lead.
- Leave the other two terminals unused or connect them to a second speaker pair if you want dual‑zone operation.
Caution
Never bridge an amp that isn’t explicitly rated for bridging. Doing so can destroy the output transistors.
Testing and Fine‑Tuning Your System
Initial Sound Check
Play a track with a wide frequency range. Listen for balance between left and right, and make sure no speaker sounds muffled.
Adjusting Gain and Crossover
Set the gain so that the amp reaches full output at about 75 % of your head unit’s volume. Adjust the low‑pass and high‑pass filters to match the speaker’s frequency response.
Phase Alignment
If the sound feels “hollow,” reverse the polarity of one speaker in each pair. This corrects phase issues that can happen during installation.
Conclusion: Get the Most Out of Your Two‑Channel Amp
Wiring four speakers to a two‑channel amplifier doesn’t have to be a headache. By understanding impedance, choosing the right wiring method, and following a careful step‑by‑step process, you’ll enjoy powerful, balanced audio without risking damage to your gear. Remember to always double‑check connections, use the proper gauge wire, and respect your amp’s load limits. With the tips and examples in this guide, you’re ready to upgrade your sound system confidently.
Frequently Asked Questions
Can I wire four 4 Ω speakers to a 2‑channel amp without bridging?
Yes. Wire two speakers in parallel to each channel, giving a 2 Ω load per channel. Ensure your amp is rated for a 2 Ω minimum load.
What happens if I wire all four speakers in parallel?
Four 4 Ω speakers in parallel create a 1 Ω load, which is too low for most amps and can cause overheating or failure.
Is it safe to bridge a 2‑channel amp for four speakers?
Only if the amp’s manual states it can handle a 4 Ω load when bridged. Use a series‑parallel wiring scheme to meet that impedance.
Do I need a crossover when wiring four speakers?
A crossover isn’t mandatory, but it protects tweeters from low frequencies and improves overall sound clarity, especially in bridged setups.
How do I check speaker polarity quickly?
Use a multimeter set to continuity. Touch one probe to the amp’s positive terminal and the other to the speaker’s positive lead; a beep confirms correct polarity.
Can I use speaker wire that’s thinner than 16 AWG?
For short runs (<5 ft) you can use 18 AWG, but thinner wire increases resistance and may reduce volume or cause heat buildup on longer runs.