Synology M 2 Nvme Ssd

The Synology M.2 NVMe SSD transforms your NAS into a high-speed storage powerhouse. This guide covers compatibility, adapter options, and the best drives to boost performance. You’ll learn how to set up and optimize NVMe caching for lightning-fast file access.
If you want to supercharge your Synology NAS, a synology m 2 nvme ssd is the ultimate upgrade. These drives use the NVMe protocol over a PCIe connection, delivering read speeds that can exceed 3,500 MB/s and write speeds above 3,000 MB/s. That is a massive leap from traditional SATA SSDs, which top out around 550 MB/s. The result is a NAS that handles large file transfers, virtual machines, and heavy workloads with ease.
Many Synology enthusiasts already know the benefits of adding fast storage, but the world of M.2 NVMe can feel confusing. There are different adapters, form factors, and drive models to consider. This guide breaks everything down in plain language. You will learn exactly how the system works, which drives to pick, and how to set it up without any guesswork.
Whether you run a DS920+ or a larger DS1522+, understanding the synology m 2 nvme ssd ecosystem helps you make smarter decisions. The right setup can turn your NAS into a high-performance hub for media, backups, and even light gaming. Let us dive into the details and get your storage running at full speed.
Key Takeaways
- A synology m 2 nvme ssd uses the PCIe interface for dramatically faster speeds than SATA SSDs.
- Synology offers dedicated adapters like the M2D20 and M2D18 to fit NVMe drives into compatible NAS models.
- Using an NVMe drive as a cache or high-performance storage pool reduces latency and improves random IOPS.
- Always check the compatibility list and choose a drive with a heatsink to avoid thermal throttling.
- Setting up the drive in DSM is simple, but proper firmware and driver updates keep it running smoothly.
- External M.2 NVMe enclosures provide a flexible alternative if your NAS lacks internal slots.
📑 Table of Contents
What Is a Synology M.2 NVMe SSD?
A synology m 2 nvme ssd is simply an NVMe solid-state drive designed to fit into a Synology NAS. The term M.2 refers to the small, rectangular form factor that plugs directly into a slot on the motherboard. NVMe stands for Non-Volatile Memory Express, a protocol built specifically for flash storage. It communicates over the PCIe bus, which is far faster than the older SATA III connection.
Synology does not sell NVMe drives under its own brand for every model. Instead, the company offers adapter cards that let you install third-party M.2 NVMe SSDs into compatible NAS units. These adapters, such as the M2D20 and M2D18, occupy a PCIe slot inside the NAS and provide one or two M.2 slots. The drives then appear in DSM as regular storage devices or as cache accelerators.
How NVMe Differs from SATA SSDs
The key difference lies in the connection interface. A standard SSD NVMe PCIe M.2 uses four PCIe lanes, while a SATA SSD uses a single cable with a much lower bandwidth ceiling. In practical terms, this means an NVMe drive can handle many more simultaneous read and write operations. For a NAS, this translates to snappier file browsing, quicker rsync backups, and smoother 4K video editing directly off the pool.
Another major advantage is latency. NVMe drives respond to commands in microseconds, whereas SATA drives take milliseconds. When you are running a database or a Docker container on your NAS, that low latency makes a noticeable difference in overall system responsiveness.
How the Synology M.2 NVMe SSD Adapter Works
To use a synology m 2 nvme ssd, you need a compatible adapter card. Synology has designed these cards to fit into the standard PCIe slots on its NAS motherboards. The M2D20 adapter supports two M.2 2280 drives and connects via a PCIe 3.0 x2 link. The M2D18 is a single-slot version that also works with many DS models. Both adapters draw power from the PCIe slot itself, so no extra cables are needed.
Once installed, the adapter shows up in the Storage Manager in DSM. You can create a storage pool directly on the NVMe drive or configure it as a read/write cache for a larger HDD or SATA SSD pool. The caching feature is particularly powerful because it keeps your most frequently accessed files on the ultra-fast NVMe media while bulk data stays on larger, cheaper drives.
Understanding PCIe Lanes and Bandwidth
The performance of your synology m 2 nvme ssd depends partly on how many PCIe lanes the adapter uses. Most Synology adapters run at PCIe 3.0, which provides enough bandwidth for current NVMe drives. A PCIe 3.0 x4 link can theoretically move about 3,500 MB/s, but the M2D20 uses an x2 link, capping practical speeds around 2,000 MB/s. Still, this is more than enough for most home and small-office workloads.
If you are curious about the broader M.2 PCIe landscape, you can read more about the M.2 PCIe NVMe SSD interface to understand how these speeds compare across different generations.
Benefits of Adding an NVMe SSD to Your NAS
Upgrading with a synology m 2 nvme ssd brings several tangible benefits. The most obvious is speed. Large file transfers that took minutes on a SATA SSD finish in seconds. For users who work with video editing or massive photo libraries, this speed boost saves hours of waiting time every week.
Another benefit is improved random input/output operations per second, commonly known as random IOPS. Traditional hard drives struggle with small, scattered read and write requests. An NVMe SSD handles these effortlessly, making your NAS feel snappy even when dozens of users access files simultaneously.
Use Cases That Benefit Most
Here are the scenarios where a synology m 2 nvme ssd makes the biggest impact:
- Media serving: Plex or Jellyfin servers deliver smooth 4K streaming when the media library sits on NVMe cache.
- Virtualization: Running Virtual Machines or Docker containers benefits enormously from the low latency of NVMe storage.
- Backup targets: Faster read speeds mean quicker rsync or Hyper Backup jobs, reducing the window for data protection.
- Active projects: Video editors and photographers can work directly off the NAS without copying files to a local workstation first.
For those who want a portable option, an external enclosure can also house an NVMe drive. You can find a detailed review of one popular option in the NVMe SSD M.2 Enclosure review, which covers speed and build quality.
Choosing the Best M.2 NVMe SSD for Your Synology System
Picking the right drive is critical. Not all M.2 NVMe SSDs are created equal, and some work better in a NAS environment than others. The first thing to check is the form factor. Synology adapters almost exclusively use the 2280 size, which is 22 millimeters wide and 80 millimeters long. Make sure any drive you buy matches this dimension.
Next, consider the endurance rating, often listed as TBW (terabytes written). NAS workloads involve constant reading and writing, especially if you use the drive as cache. A drive with a higher TBW rating will last longer under heavy use. Enterprise-grade NVMe drives typically offer better endurance than consumer models.
Top Drive Picks for Synology NAS
Many users ask which specific model to buy. Here are a few reliable options that pair well with a synology m 2 nvme ssd setup:
- Samsung 970 EVO Plus: A widely tested consumer NVMe drive with excellent sequential speeds and a solid endurance rating. You can read more about this model in the Samsung 970 EVO Plus NVMe M.2 SSD guide.
- Crucial P3 Plus: Offers PCIe Gen4 speeds at a competitive price, making it a great value for high-throughput tasks.
- WD Blue SN570: A reliable workhorse with low power consumption, ideal for always-on NAS environments.
Capacity is another factor. A 1TB NVMe M.2 SSD provides a sweet spot for caching, while larger 2TB or 4TB drives serve well as primary high-performance pools. The key is matching the capacity to your actual workload.
Heatsinks and Thermal Management
One detail people often overlook is heat. NVMe drives can get warm under sustained loads, and some NAS cases have limited airflow. Many M.2 NVMe SSDs come with a small aluminum heatsink included. If yours does not, you can buy an aftermarket M.2 heatsink that sticks directly onto the drive. Keeping the temperature in check prevents thermal throttling, which would otherwise slow down your synology m 2 nvme ssd during long transfers.
Step-by-Step Setup Guide for Synology M.2 NVMe Storage
Setting up a synology m 2 nvme ssd is straightforward if you follow the right steps. Before you begin, make sure your NAS model is compatible with the M.2 adapter you plan to use. Synology publishes a compatibility list for every adapter, and it is easy to find in the product manual or on the Synology website.
- Power off the NAS and unplug it from the wall. Static electricity can damage components, so touch a grounded metal surface before handling the drive.
- Open the NAS case and locate an available PCIe slot. Remove the blank bracket if needed.
- Insert the M.2 adapter card firmly into the PCIe slot. Make sure it sits flush and the screw holes align with the case.
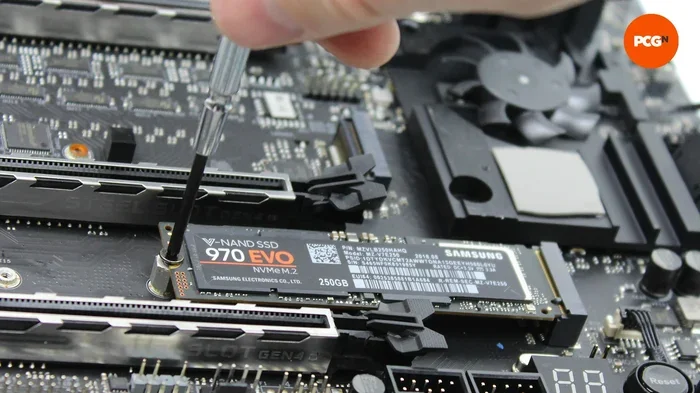
- Install the NVMe SSD into the adapter. The drive clicks into the M.2 slot at a 30-degree angle, then you push it down and secure it with a small screw.
- Close the case, plug the NAS back in, and power it on.
- Log into DSM and open Storage Manager. The new drive should appear under the Storage Pool tab.
- Create a storage pool or configure the drive as a cache device, following the on-screen wizard.
Once the pool is created, you can move folders to it or set it as a cache target. The process is the same whether you are using a single drive or a mirrored pair. If you run into any driver issues, check the NVMe M.2 SSD WD Blue driver download page for the latest firmware and driver updates that may help with compatibility.
Configuring Cache vs. Primary Storage
DSM gives you two main options for the NVMe drive. You can use it as a read cache, a write cache, or both. A read cache keeps copies of frequently accessed files in the fast NVMe memory, so they load instantly. A write cache temporarily holds incoming write commands before flushing them to the larger storage pool. This speeds up write operations significantly.
For most users, setting the NVMe drive as a read cache for an HDD-based pool delivers the best balance of speed and cost. You get the responsiveness of flash storage for everyday tasks while keeping your bulk data safe on high-capacity hard drives.
Common Mistakes and Expert Tips for M.2 NVMe SSDs
Even with a simple setup, a few common mistakes can cause problems. One of the biggest is ignoring the compatibility list. Not every M.2 NVMe SSD works perfectly with every Synology adapter. Some drives may show errors or fail to be recognized if they use a newer PCIe generation or an uncommon firmware revision. Always double-check the Synology compatibility database before purchasing.
Another mistake is skipping the heatsink. In a cramped NAS case, an NVMe drive running hot will throttle its speeds after a few minutes of heavy use. A simple aluminum heatsink solves this problem and keeps performance consistent over long workloads.
Expert Insight: Keep Firmware Updated
Synology regularly releases DSM updates that improve NVMe drive support. These updates often include better SLC caching algorithms and fixes for specific drive models. Setting your NAS to auto-update ensures your synology m 2 nvme ssd always runs with the latest optimizations. If you ever notice a drop in performance, a quick firmware check can often resolve the issue.
Quick Tips for Longevity
- Enable S.M.A.R.T. monitoring in DSM and set up email alerts for drive health.
- Avoid filling the NVMe drive to 100 percent; leaving 10 to 20 percent free helps maintain write speeds.
- Use the drive as a cache first if you are unsure about endurance, because cache wear is less critical than primary storage wear.
- For external expansion, consider an M.2 NVMe SSD enclosure to protect the drive and add portability.
With the right drive, proper cooling, and a little maintenance, your Synology NAS will deliver NVMe speeds for years to come.
Conclusion
A synology m 2 nvme ssd is one of the most effective ways to breathe new life into your NAS. The combination of blazing read and write speeds, ultra-low latency, and simple adapter-based installation makes it a compelling upgrade for any Synology user. Whether you use the drive as a high-performance cache or as a primary storage pool, the difference in everyday responsiveness is immediate and noticeable.
Remember to choose a compatible 2280 NVMe drive, install a heatsink, and keep your firmware updated. With these steps, you will unlock the full potential of your NAS and enjoy a storage system that keeps up with even the most demanding workloads.
FAQ
Can I use any M.2 NVMe SSD with a Synology NAS?
Not every M.2 NVMe SSD is guaranteed to work. Synology maintains a compatibility list for each adapter model. Always check that your chosen drive appears on the list before purchasing to avoid recognition issues or performance problems.
Do I need a heatsink for my Synology M.2 NVMe SSD?
It is highly recommended. NVMe drives can reach high temperatures during sustained writes, and NAS cases often have limited airflow. A heatsink prevents thermal throttling, keeping your speeds consistent even under heavy load.
What is the difference between using an NVMe drive as cache versus primary storage?
As a cache, the NVMe drive stores copies of frequently accessed data to speed up retrieval, while your main HDD pool holds the bulk of the data. As primary storage, the NVMe drive becomes the main location for your files, offering maximum speed but at a higher cost per gigabyte.
How many M.2 NVMe SSDs can I install in my Synology NAS?
This depends on your NAS model and the adapter you use. The M2D20 adapter supports two drives, while the M2D18 supports one. Some higher-end NAS models also have built-in M.2 slots. Always check your specific model’s specifications.
Will an NVMe SSD work as an external drive for my Synology NAS?
Yes, you can place an NVMe SSD in an external M.2 enclosure and connect it via USB or Thunderbolt. This is a great option if your NAS lacks internal slots or if you want portable high-speed storage.
What capacity should I choose for a synology m 2 nvme ssd cache?
1TB is usually sufficient for most home users as a cache. It provides enough space to hold your most active files while keeping the cost reasonable. For heavier workloads, a 2TB drive offers more headroom.