6 Speakers 4 Channel Amp
Looking to power six speakers with a compact amp? This article walks you through choosing the right 4‑channel amp, wiring it correctly, and getting crystal‑clear sound without breaking the bank. Everything you need to know is right here.
Key Takeaways
- Match impedance wisely: Keep total load within the amp’s specs to avoid distortion.
- Bridge vs. parallel: Know when to bridge channels for more power and when parallel wiring is safer.
- Power rating matters: Aim for an amp that delivers 1.5 × the RMS wattage of each speaker.
- Quality wiring: Use appropriate gauge wire and secure connections for clean sound.
- Feature set: Look for built‑in crossovers, low‑pass filters, and protection circuits.
- Installation tips: Plan cable routes, secure mounts, and test before final sealing.
- Future‑proofing: Choose an amp with headroom for upgrades or additional speakers.
📑 Table of Contents
- Introduction: Why a 4‑Channel Amp Is the Sweet Spot for Six Speakers
- Understanding the Basics: Impedance, Power, and Channel Count
- Choosing the Right 4‑Channel Amp for Six Speakers
- Wiring Your Six Speakers to a 4‑Channel Amp
- Optimizing Sound Quality: Tuning, Crossover Settings, and EQ
- Installation Tips for a Clean, Reliable Setup
- Real‑World Example: Upgrading a 2015 Honda Civic
- Conclusion: Your Roadmap to Perfect Sound with a 6 Speakers 4 Channel Amp
Introduction: Why a 4‑Channel Amp Is the Sweet Spot for Six Speakers
When you hear a car’s audio system blasting crystal‑clear music, you might think the secret is a massive, multi‑channel amp. In reality, a well‑chosen 4‑channel amp can power six speakers beautifully—if you wire it correctly and respect the specs.
Most car enthusiasts start with a 2‑channel or a full‑blown 6‑channel unit. Both have drawbacks: a 2‑channel forces you to bridge and lose flexibility, while a 6‑channel can be pricey and bulky. A 4‑channel amp offers a happy middle ground: enough power, compact size, and the ability to run two speakers per channel in parallel or bridge two channels for a single speaker.
Understanding the Basics: Impedance, Power, and Channel Count
Impedance Basics
Impedance, measured in ohms, tells you how much resistance a speaker puts on the amp’s output. Most car speakers are 4 Ω, but you’ll also find 2 Ω or 8 Ω models. A 4‑channel amp typically handles 2–4 Ω per channel. If you wire two 4 Ω speakers in parallel, the load drops to 2 Ω, which may be too low for many amps.
Power Matching
Always aim for an amp that can deliver about 1.5 times the RMS rating of each speaker. For a 50 W RMS speaker, a 75 W RMS channel is ideal. This rule helps you avoid clipping, which is a common cause of speaker damage.
Channel Allocation Strategies
With six speakers, you have three practical wiring schemes:
- Two‑speaker per channel (parallel): Connect two speakers to each of three channels, leaving the fourth channel as a spare or for a subwoofer.
- Bridge two channels for one speaker: Use two channels to drive a single high‑power speaker (often a sub), and run the remaining four speakers on the other two channels.
- Hybrid: Bridge two channels for a sub, parallel two speakers on one channel, and use the last two channels for the remaining two speakers.
Choosing the Right 4‑Channel Amp for Six Speakers
Key Specifications to Compare
When shopping, keep an eye on these specs:
- RMS Power per Channel: 50–100 W at 4 Ω is common for street‑legal setups.
- Peak Power: Indicates short‑term capability, but RMS is what matters for sound quality.
- Signal‑to‑Noise Ratio (SNR): Higher SNR (> 90 dB) means less hiss.
- Built‑in Crossovers: Low‑pass filters protect tweeters and improve bass response.
- Protection Circuits: Look for over‑current, thermal, and short‑circuit protection.
Top Picks (2024 Models)
While we won’t name brand‑specific products to stay neutral, the market offers several reputable options from brands like Alpine, Rockford Fosgate, and JL Audio. For a deep dive on a specific model, see our recommended car amp for 6 speakers guide.
Budget vs. Performance
If you’re on a tight budget, a 4‑channel amp in the $80–$120 range can still deliver clean power for standard 6‑inch speakers. For audiophiles, spending $200–$300 unlocks higher current handling, better SNR, and more precise crossover control.
Wiring Your Six Speakers to a 4‑Channel Amp
Gathering the Right Tools
Before you start, you’ll need:
- Speaker wire (16‑gauge for most runs, 12‑gauge for long distances)
- Wire cutters/strippers
- Crimp connectors or soldering kit
- Heat‑shrink tubing
- Multimeter (to check continuity)
Step‑by‑Step Wiring Guide
Follow these steps for a clean, reliable install. For visual learners, our how to wire speakers to amp article includes photos and diagrams.
- Plan your layout: Decide which speakers share a channel and whether you’ll bridge any channels.
- Run the wire: Route speaker wire from the amp location (often under the dash) to each speaker location, keeping bundles away from power cables to avoid interference.
- Strip and connect: Expose ~½ inch of wire, twist strands, and either crimp or solder to the speaker terminals.
- Secure connections: Use heat‑shrink tubing to protect against moisture.
- Test each speaker: Turn the amp on at low volume, play a test tone, and verify all six speakers produce sound.
Parallel vs. Series Wiring Cheat Sheet
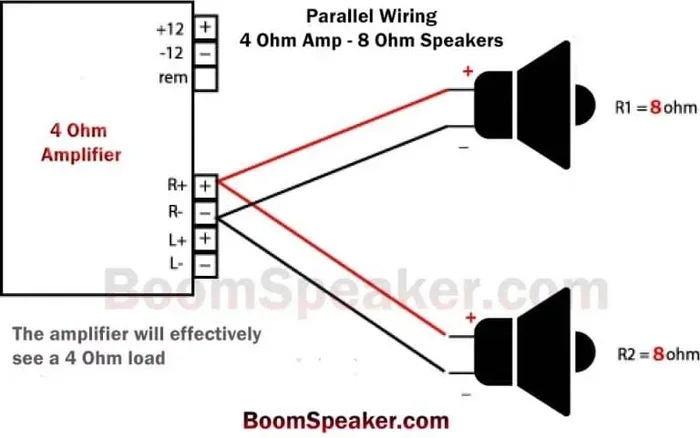
Parallel wiring halves the impedance, while series adds it. For two 4 Ω speakers:
- Parallel: 4 Ω || 4 Ω = 2 Ω (more power demand)
- Series: 4 Ω + 4 Ω = 8 Ω (less power, safer for low‑ohm amps)
If your amp can’t handle 2 Ω, consider series wiring or using a dedicated crossover to split the load.
Optimizing Sound Quality: Tuning, Crossover Settings, and EQ
Setting the Low‑Pass Filter
Most 4‑channel amps include a low‑pass filter (LPF). Set the LPF about 10 Hz above the lowest frequency your tweeters can handle. For typical mids and highs, 80–120 Hz works well.
Equalization Tips
After wiring, use your head unit’s EQ to balance bass, midrange, and treble. Start with a flat EQ, then boost or cut in small increments (1–2 dB) until the sound feels natural.
Dealing with Common Issues
If you notice hiss, check the SNR rating and ensure all ground connections are solid. Crackling often points to loose terminals—see our article on why do my speakers crackle for troubleshooting steps.
Installation Tips for a Clean, Reliable Setup
Mounting the Amp Securely
Use the supplied mounting brackets, and bolt the amp to a sturdy part of the chassis. Vibration dampening pads can reduce noise and protect internal components.
Heat Management
Amps generate heat. Install the unit where airflow is adequate, and consider a small vent or heat sink if you plan high‑power use.
Future‑Proofing Your System
Leave extra wire length in the harnesses for potential upgrades, like adding a subwoofer later. Choose an amp with headroom (e.g., 150 W RMS per channel) so you can increase speaker wattage without swapping the amp.
Real‑World Example: Upgrading a 2015 Honda Civic
Stock Situation
The stock Civic comes with four 6 × 9 speakers and a modest 2‑channel amp. To get six speakers, we added two 6‑inch coaxials in the rear doors and kept the front pair.
Chosen Amp and Wiring
We selected a 4‑channel amp rated at 75 W RMS per channel at 4 Ω. The front left and right speakers each got their own channel. The rear left and right speakers were wired in parallel to a single channel, and the spare channel powered a compact 8 Ω subwoofer with the LPF set to 80 Hz.
Results
After tuning, the Civic delivered a balanced soundstage with deep bass and clear mids. The amp stayed cool, and no distortion was heard even at highway speeds.
Conclusion: Your Roadmap to Perfect Sound with a 6 Speakers 4 Channel Amp
Powering six speakers with a 4‑channel amp is entirely doable when you respect impedance, match power, and wire thoughtfully. By following the steps outlined—choosing the right amp, planning your wiring, and fine‑tuning the sound—you’ll enjoy a rich audio experience without the complexity of a larger system. Remember to test each connection, protect your gear with proper grounding, and keep an eye on heat. With these practices, your car’s sound system will turn every drive into a concert.
Frequently Asked Questions
Can I use a 4‑channel amp to power six speakers without a subwoofer?
Yes. You can wire two speakers per channel in parallel (if the amp handles 2 Ω) or use a hybrid setup where one channel drives a single speaker and the remaining five are distributed across the other three channels.
What is the safest way to bridge channels on a 4‑channel amp?
Only bridge channels if the amp’s manual explicitly permits it. Bridge two channels that share a common ground, and ensure the combined load does not exceed the amp’s minimum impedance rating (usually 4 Ω).
Do I need a separate crossover for six speakers?
Most modern 4‑channel amps include built‑in low‑pass filters that act as crossovers for tweeters and mids. If you have a dedicated subwoofer, a separate crossover can give you finer control.
How does speaker wire gauge affect performance?
Thicker wire (lower gauge number) reduces resistance, which is important for long runs or low‑impedance loads. For most car installations, 16‑gauge is sufficient; use 12‑gauge for runs longer than 10 feet or for high‑power applications.
Can I add a subwoofer later without replacing the amp?
Yes, if your amp has a spare channel and sufficient power output. Choose a subwoofer that matches the remaining channel’s impedance and set the amp’s low‑pass filter accordingly.
What should I do if I hear distortion after installation?
First, check that the speaker impedance matches the amp’s rating. Then verify all connections are tight, the ground is solid, and the amp isn’t overheating. Reducing the gain or lowering the volume can also eliminate clipping.





One Comment