Remove Graphics Card from Laptop
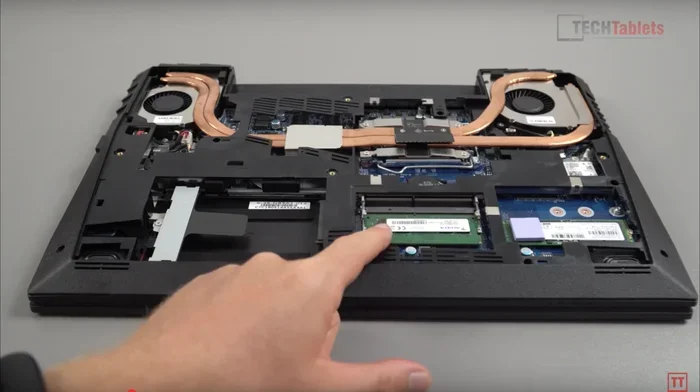
Removing a graphics card from a laptop is a delicate process that requires patience and the right tools. Whether you are upgrading, replacing, or troubleshooting, this guide walks you through every step safely. You will learn how to prepare your laptop, disassemble it carefully, and handle the GPU without causing damage.
Laptops have come a long way. They are now powerful machines that can handle gaming, video editing, and even 3D rendering. At the heart of this power lies the graphics card. Sometimes, you need to remove it. Maybe you are upgrading. Maybe it is overheating. Or maybe it simply stopped working.
Whatever the reason, removing a graphics card from a laptop is not as simple as pulling out a USB drive. It requires care, the right tools, and a basic understanding of your laptop’s internal structure. In this guide, we walk you through the entire process step by step. You will learn how to prepare, what tools you need, and how to avoid common mistakes.
Let us be clear upfront. Not all laptops have removable graphics cards. Many modern laptops have GPUs soldered directly to the motherboard. But if your laptop has a dedicated GPU that can be removed, this guide is for you. We will also share tips on laptop upgrades and alternatives if your GPU is not removable.
Key Takeaways
- Safety First: Always disconnect power and ground yourself before touching internal components.
- Right Tools Matter: Using the correct screwdrivers and anti-static wrist strap prevents damage.
- Know Your Laptop: Not every laptop has a removable graphics card. Check your model first.
- Go Slow: Rushing the removal process can break clips, cables, or the motherboard.
- Thermal Paste Matters: Reapply thermal paste when reinstalling or replacing the GPU.
- Warranty Check: Opening your laptop may void the warranty. Check before you start.
- Seek Help When Needed: Some laptops require professional removal. Know your limits.
📑 Table of Contents
Why You Might Need to Remove Your Graphics Card
There are several reasons someone would want to remove graphics card from laptop. Understanding your reason helps you plan the process better. Here are the most common ones:
Upgrading to a Better GPU
Some gaming laptops and workstation laptops allow you to swap out the graphics card. If your current GPU is outdated, removing it and installing a newer one can boost performance significantly. This is especially true for creative professionals who rely on dedicated graphics for rendering and modeling.
Fixing Overheating Issues
Graphics cards generate a lot of heat. Over time, dust builds up, and thermal paste dries out. This can cause your GPU to overheat. In some cases, removing the graphics card lets you clean the area thoroughly and reapply fresh thermal paste. This simple step can lower temperatures by 10 to 15 degrees.
Replacing a Faulty GPU
When a graphics card fails, it can cause screen artifacts, crashes, or no display at all. If your laptop has a removable GPU, replacing it is often cheaper than buying a new laptop. You simply remove the old card and install a new one.
Troubleshooting Display Problems
Sometimes the GPU is not the problem, but you need to remove it to test other components. Removing the dedicated GPU helps you determine whether the issue lies with the graphics card or somewhere else in the system.
Tools and Preparation for Removing a Laptop GPU
Before you start, gathering the right tools makes a huge difference. You do not need much, but having everything ready saves time and prevents frustration.
Essential Tools You Will Need
- Phillips head screwdriver (small size, usually #1 or #2)
- Anti-static wrist strap to prevent electrostatic discharge
- Plastic spudger or pry tool for opening clips and covers
- Compressed air canister for cleaning dust
- Isopropyl alcohol (90% or higher) for cleaning thermal paste
- Lint-free cloth for wiping surfaces
- New thermal paste if you plan to reinstall the GPU
- Small container or magnetic mat for organizing screws
Preparation Steps
Proper preparation is the most overlooked part of this process. Skipping these steps can lead to damage or injury. Follow them every time.
- Shut down your laptop completely. Do not just put it to sleep. Turn it off and unplug the power adapter.
- Disconnect all external devices. Remove USB drives, monitors, mice, and anything else plugged in.
- Ground yourself. Wear an anti-static wrist strap and attach it to a metal part of the laptop chassis. This prevents static electricity from damaging sensitive components.
- Work on a clean, flat surface. A large table with good lighting is ideal. Avoid carpets and soft surfaces.
- Back up your data. Just in case something goes wrong, make sure your important files are safe.
Check Your Laptop Model
Not every laptop allows you to remove laptop ram or swap out the GPU. Before you start, check your laptop model online. Look for service manuals or teardown videos. If your GPU is soldered to the motherboard, you cannot remove it without specialized equipment. In that case, consider an external GPU enclosure as an alternative.
You may also want to read our guide on how to remove RAM from a laptop if you plan to upgrade memory alongside your GPU work. The process shares some similar disassembly steps.
Step-by-Step Guide to Remove Graphics Card from Laptop
Now that you are prepared, let us walk through the actual removal process. Follow each step carefully and do not rush.
Step 1: Open the Laptop Back Panel
Flip your laptop over and locate the screws holding the back panel. Use your Phillips screwdriver to remove them. Keep the screws in a safe place. Some laptops have different sized screws, so pay attention to where each one came from. Use your plastic spudger to gently pry the panel open. Start at the corners and work your way around.
Step 2: Locate the Graphics Card
Once the back panel is off, you will see the internal components. The dedicated graphics card is usually a separate board connected to the motherboard. It may have its own fan and heat sink. In some laptops, the GPU is part of a larger module that also includes the CPU and RAM. Identify the GPU by its shape and the cable connecting it to the display or the fan attached to it.
Step 3: Disconnect the Power Cable
Before touching the GPU, disconnect any power cables connected to it. These are usually small connectors plugged into the motherboard. Use your fingers or a plastic spudger to gently pull them out. Never yank on the wires. Be gentle and steady.
Step 4: Remove the Cooling Assembly
The graphics card is typically held in place by a cooling assembly. This includes the heat sink and fan. Remove the screws that hold the cooling assembly to the GPU. Once the screws are out, carefully lift the heat sink away. If it feels stuck, gently wiggle it side to side. Do not use excessive force.
Step 5: Detach the Graphics Card
Now you will see the GPU board. It is usually held by a retention clip or a few screws. Release the clip by pressing it down or to the side. If there are screws, remove them. Gently lift the graphics card straight up. Do not twist or bend it. If the card feels stuck, check for any hidden screws or connectors you might have missed.
If you are also planning to upgrade your memory, check out our article on how to remove laptop RAM for a smooth workflow during your hardware upgrades.
Step 6: Clean the Area
With the GPU removed, this is a great time to clean the surrounding area. Use compressed air to blow out dust from the motherboard and fan headers. If you are reusing the GPU, apply a small amount of isopropyl alcohol to a lint-free cloth and gently clean the old thermal paste from the GPU’s contact surface. Let it dry completely before applying new paste.
Step 7: Store the GPU Safely
If you are not reinstalling the GPU right away, store it in an anti-static bag. Place it in a safe, dry location. Avoid touching the gold contacts on the bottom of the card. Static electricity can damage the GPU even when it is not installed.
Common Mistakes to Avoid When Removing Graphics Cards
Even experienced users make mistakes. Here are the most common ones and how to avoid them.
Skipping the Anti-Static Precautions
Static electricity can fry your GPU in an instant. Always wear an anti-static wrist strap or touch a grounded metal object before handling the card. This is the number one mistake people make.
Forcing Components Loose
If something does not come off easily, stop. Look for hidden screws or clips. Forcing a component can break the motherboard or damage the GPU connector. Patience is your best friend during this process.
Losing Screws
Laptops use many small screws. Losing even one can be a problem. Use a magnetic mat or a small container to keep track of every screw. Label them if your laptop uses different sizes.
Not Reapplying Thermal Paste
If you remove the GPU and put it back without fresh thermal paste, your temperatures will be worse than before. Always clean off the old paste and apply a thin, even layer of new thermal paste. A pea-sized drop in the center works for most GPUs.
Ignoring the Warranty
Opening your laptop may void the manufacturer’s warranty. Before you start, check your warranty status. If your laptop is still under warranty, consider taking it to a professional instead of doing it yourself.
If you are curious about what makes a laptop worth its graphics performance, you can explore our guide on the best laptop with the best graphics card for insights on what to look for in a GPU-equipped machine.
What to Do After Removing the Graphics Card
Once the GPU is out, you have a few options depending on your goal.
Reinstalling the Same GPU
If you are cleaning or replacing thermal paste, simply reverse the steps. Apply new thermal paste to the GPU’s contact surface. Reattach the cooling assembly. Connect the power cable. Secure the GPU with its retention clip or screws. Replace the back panel and test your laptop.
Installing a New GPU
If you are upgrading, make sure the new GPU is compatible with your laptop. Check the form factor, power requirements, and connector type. Follow the same installation steps in reverse. After installing, update your GPU drivers to get the best performance.
Using an External GPU
If your laptop does not have a removable GPU, you are not out of options. An external GPU enclosure connects to your laptop through a Thunderbolt or USB-C port. This lets you use a desktop graphics card with your laptop. It is not as fast as an internal GPU, but it is a great workaround for laptops with soldered graphics.
When to Seek Professional Help
Not everyone is comfortable opening their laptop. That is perfectly okay. Here are some signs that you should seek professional help:
- Your laptop is still under warranty.
- You cannot find a service manual for your model.
- The GPU appears soldered to the motherboard.
- You feel unsure about any step in the process.
- You do not have the right tools.
A professional technician can remove the graphics card safely and quickly. They also have specialized tools that make the job easier. If you are unsure, it is always better to ask for help than to risk damaging your laptop.
For those who need a powerful machine for demanding tasks but prefer not to tinker with internal hardware, consider checking out our guide on the is a graphics card necessary for programming to understand how much GPU power you actually need for your workflow.
Conclusion
Removing a graphics card from a laptop is a task that anyone can do with the right guidance and tools. The key is preparation, patience, and care. You now know how to gather the right tools, prepare your laptop, and follow each step of the removal process safely. You also know what mistakes to avoid and what to do after the GPU is out.
Remember, not every laptop has a removable graphics card. Check your model first. If yours does not, an external GPU enclosure is a solid alternative. And if you are ever in doubt, a professional technician is always a good call.
Take your time, follow this guide, and you will have your laptop’s graphics card removed safely and confidently. Happy upgrading!
Frequently Asked Questions
Can I remove the graphics card from any laptop?
No, not all laptops have removable graphics cards. Many modern laptops have GPUs that are soldered directly to the motherboard. Before attempting removal, check your laptop model online or consult the service manual to confirm whether your GPU can be physically removed.
Do I need special tools to remove a graphics card from a laptop?
You need basic tools like a small Phillips screwdriver, an anti-static wrist strap, and a plastic spudger. Having compressed air and isopropyl alcohol on hand is also helpful for cleaning and thermal paste replacement.
Will removing the graphics card void my laptop warranty?
In most cases, yes. Opening your laptop and removing internal components typically voids the manufacturer’s warranty. Check your warranty terms before starting. If your laptop is still under warranty, consider professional service instead.
How do I know if my laptop GPU is soldered or removable?
Search for your laptop model online and look for teardown videos or service manuals. If the GPU is listed as a separate module that can be unscrewed and unplugged, it is removable. If it appears integrated into the motherboard with no separate connector, it is soldered.
Can I use my laptop without a graphics card after removal?
If your laptop has integrated graphics built into the processor, you can still use it for everyday tasks like browsing, word processing, and video playback. However, you will lose the ability to run graphics-intensive applications like gaming or 3D rendering.
How often should I replace the thermal paste when removing my GPU?
It is best practice to replace thermal paste every time you remove the GPU or its cooling assembly. Fresh thermal paste ensures optimal heat transfer between the GPU and the heat sink, keeping temperatures low and performance stable.