Applying New Thermal Paste to a Laptop Cpu Gpu
Applying new thermal paste to your laptop CPU and GPU is one of the simplest ways to boost cooling performance and extend your device’s lifespan. Over time, thermal paste dries out and loses effectiveness, causing your laptop to run hotter than it should. This guide walks you through the entire process safely and easily, even if you have never opened your laptop before.
Your laptop works hard every single day. Whether you are gaming, editing videos, or just browsing the web, your CPU and GPU generate a lot of heat. That heat needs somewhere to go, and this is where thermal paste comes in.
Over time, the thermal paste between your processor and its heat sink dries out. When this happens, your laptop starts running hotter. Fans spin louder. Performance drops. Eventually, your device may even throttle or shut down unexpectedly.
The good news is that applying new thermal paste to a laptop CPU GPU is one of the easiest maintenance tasks you can do. It costs just a few dollars and takes about 20 minutes. In this guide, we will walk you through every single step. You do not need to be a tech expert to get this done.
Before we dive in, let us talk about why this matters so much. Think of thermal paste as the bridge between your hot processor and the metal heat sink that pulls that heat away. Without a good bridge, heat gets trapped. Your laptop heats up. Your experience suffers. A fresh layer of paste restores that connection and keeps everything running smoothly.
Key Takeaways
- Thermal paste matters: Fresh thermal paste dramatically improves heat transfer between your processor and heat sink.
- You can do it yourself: The process is straightforward and requires only a few basic tools.
- Clean thoroughly: Removing old paste completely is just as important as applying new paste.
- Less is more: A small pea-sized dot of paste is all you need for optimal coverage.
- Reapply regularly: Replace thermal paste every 2-3 years for best laptop performance.
- Safety first: Always power off and unplug your laptop before starting any disassembly.
📑 Table of Contents
What Is Thermal Paste and Why Does It Matter?
Thermal paste, also called thermal compound, is a gooey substance that fills tiny gaps between your processor and its heat sink. These gaps exist even on perfectly smooth surfaces. Air is a terrible conductor of heat. Thermal paste replaces that air with a material that transfers heat much more efficiently.
Here is what happens when you skip this simple maintenance step:
- Higher temperatures: Your CPU and GPU run hotter than they should.
- Slower performance: Modern processors slow down when they get too hot.
- Louder fans: Your laptop fans work harder to compensate.
- Shorter lifespan: Prolonged heat exposure damages internal components over time.
- Unexpected shutdowns: Your laptop may shut off to protect itself from overheating.
Most factory-applied thermal paste lasts about two to three years. After that, it starts to degrade. If your laptop is older than that or if you have noticed rising temperatures, it is time for a refresh.
You might also want to check whether you need thermal paste at all before diving in. Our guide on Do You Need Thermal Paste For CPU covers this in more detail and can help you decide if your specific situation calls for reapplication.
Types of Thermal Paste
Not all thermal pastes are created equal. Here is a quick look at the most common types:
- Standard thermal paste: Affordable and effective for most users. This is what you want for everyday laptop maintenance.
- Liquid metal paste: Offers superior thermal conductivity but is harder to apply and more expensive. Best for advanced users.
- Ceramic-based paste: Non-conductive and safe to use around sensitive electronics. A great middle-ground option.
- Carbon-based paste: Non-electrically conductive with good performance. Easy to work with for beginners.
For most laptop users, a standard non-conductive thermal paste is the best choice. It is safe, affordable, and gets the job done. If you want to learn more about matching your components for the best thermal performance, check out our article on How To Match A CPU And GPU for helpful tips.
What You Will Need Before You Start
Gathering your supplies before you begin makes the whole process much smoother. Here is your checklist:
- New thermal paste: A small tube goes a long way. A pea-sized amount is all you need.
- Isopropyl alcohol (90% or higher): This is what you will use to clean off the old paste.
- Lint-free cloth or coffee filter: For wiping surfaces clean without leaving fibers behind.
- Small flathead screwdriver or plastic spudger: For removing screws and gently prying open panels.
- Anti-static wrist strap (optional): This protects your components from static electricity damage.
- A well-lit workspace: Good lighting helps you see small screws and connectors clearly.
You do not need fancy tools. Most of these items cost less than fifteen dollars total. A coffee filter works just as well as specialty lint-free cloths, so do not feel like you need to buy expensive supplies.
Quick Tips Before Disassembly
Before you start taking your laptop apart, keep these tips in mind:
- Always power off your laptop completely and unplug it from the charger.
- Remove the battery if your laptop has a removable one.
- Take a photo of every cable and screw before you remove them. This makes reassembly much easier.
- Work on a clean, flat surface. A kitchen table with a soft cloth works great.
- Keep screws organized. A muffin tin or small container helps you keep track of different sizes.
Taking these precautions protects both you and your laptop. Static electricity can damage sensitive components, and losing a tiny screw in a dark corner is nobody’s idea of a good time.
Step-by-Step Guide to Applying New Thermal Paste
Now for the part you have been waiting for. Here is the complete process for applying new thermal paste to a laptop CPU GPU. Follow each step carefully and you will have your laptop running cooler in no time.
Step 1: Open Your Laptop
Start by removing the bottom panel of your laptop. Most models have screws along the underside that hold the panel in place. Use your screwdriver to carefully remove each screw. Place them somewhere safe.
Once the screws are out, gently lift the panel off. Some laptops may have clips holding the panel in place. Work slowly and avoid using excessive force.
At this point, you may see your CPU and GPU heat sinks. They are the large metal pieces attached to the main circuit board. Do not touch them yet. We need to remove them first.
Step 2: Disconnect the Heat Sink
Every laptop is a little different, but the general process is similar. Look for screws or clips holding the heat sink to the CPU and GPU. Carefully remove these fasteners.
Once all screws are out, gently wiggle the heat sink to loosen it. Do not pull too hard. There may be a thermal pad or old paste creating a suction effect. A gentle rocking motion usually does the trick.
After removing the heat sink, you will see the old thermal paste on the processor and GPU die. This is what we need to clean off.
Step 3: Clean the Old Thermal Paste
This step is critical. Do not rush through it. Any leftover old paste will reduce the effectiveness of your new application.
Dampen a lint-free cloth or coffee filter with isopropyl alcohol. Gently wipe the surface of the CPU and GPU in a circular motion. You want to see a clean, shiny surface underneath. It may take a few passes to get everything off.
For stubborn residue, apply a small amount of alcohol directly to the surface and let it sit for a few seconds before wiping. Avoid using anything abrasive. You do not want to scratch your processor.
Also clean the inside of the heat sink. The contact surface on the heat sink needs to be clean too. A quick wipe with your alcohol-dampened cloth does the job.
Let everything dry completely before moving to the next step. This usually takes about a minute. The alcohol evaporates quickly, so you will not need to wait long.
Step 4: Apply the New Thermal Paste
This is where the magic happens. Take your new tube of thermal paste. You only need a tiny amount.
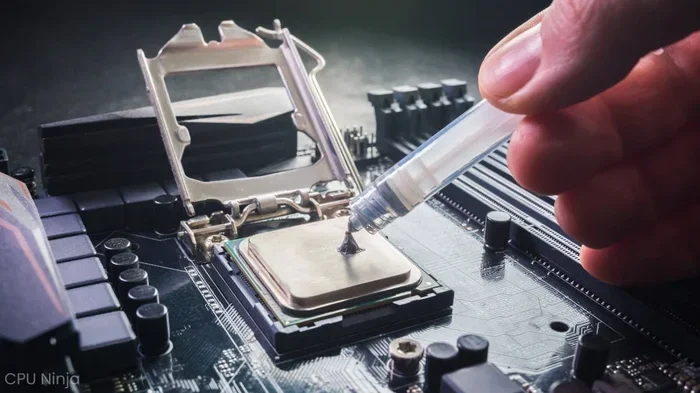
Squeeze a small pea-sized dot onto the center of the CPU die. That is it. You do not need to spread it. When you place the heat sink back on, the pressure will spread the paste evenly across the surface.
Here is a common mistake to avoid: do not use too much paste. Excess paste can squeeze out onto the motherboard and cause short circuits. A little goes a long way.
If you are applying paste to the GPU as well, use the same method. One small dot in the center of the GPU die. Less is definitely more when it comes to thermal paste application.
Step 5: Reattach the Heat Sink
Carefully place the heat sink back onto the CPU and GPU. Align it properly with the mounting holes or clips. Press down gently but firmly.
Replace all the screws or clips you removed earlier. Tighten them in a cross pattern if possible. This ensures even pressure across the surface. Do not overtighten the screws. Just snug them up firmly.
Once the heat sink is secure, reconnect any cables you may have disconnected. Fan cables are the most common ones. Make sure they click into place securely.
Step 6: Close Up and Test
Replace the bottom panel of your laptop and screw it back in. Reconnect the battery if you removed it. Plug in your charger and power on the laptop.
Monitor your temperatures for the next few hours. You should notice a drop in both CPU and GPU temperatures compared to before the repaste. Many users see a 5 to 15 degree Celsius improvement, which makes a big difference in performance and noise levels.
If everything looks good, you are done! You have successfully applied new thermal paste to your laptop CPU GPU. Enjoy the cooler, quieter operation.
Common Mistakes to Avoid
Even with the best intentions, people make mistakes when applying thermal paste. Here are the most common ones and how to avoid them:
- Using too much paste: This is the number one mistake. Excess paste squeezes out and can cause problems. Stick to a small pea-sized dot.
- Not cleaning old paste properly: Even a thin layer of old paste reduces thermal conductivity. Clean thoroughly.
- Using the wrong type of paste: Avoid conductive pastes near sensitive components unless you are experienced. Stick with non-conductive options.
- Overtightening screws: This can crack the motherboard or damage the CPU socket. Tighten just enough.
- Forgetting to reconnect fan cables: This leads to immediate overheating. Double-check all connections before powering on.
- Reusing old thermal paste: Do not scoop paste back into the tube. Always use fresh paste for best results.
Avoiding these mistakes will save you from headaches and potential damage. Take your time and work carefully.
When Should You Reapply Thermal Paste?
Knowing when to reapply is just as important as knowing how. Here are the signs that your thermal paste needs replacing:
- Your laptop runs hotter than usual: If temperatures have crept up over time, old paste may be the culprit.
- Fans are louder than before: Fans spin faster when temperatures rise, indicating poor heat transfer.
- Performance drops: Thermal throttling causes slowdowns during demanding tasks.
- Your laptop is 2-3 years old: Even without symptoms, preventive repasting every few years is a good practice.
- You have replaced the heat sink or CPU/GPU: Always apply fresh paste when reassembling these components.
If you have just installed a new GPU in your laptop, you will want to make sure everything is set up correctly afterward. Check out our guide on What To Do After Installing New GPU for helpful post-installation tips and best practices.
Expert Insights on Laptop Thermal Management
Beyond just reapplying paste, there are other ways to keep your laptop cool. Here are some expert-backed tips:
- Elevate your laptop: Using a stand or even a book improves airflow underneath the device.
- Clean your vents regularly: Dust buildup blocks airflow and causes heat to build up inside.
- Use a cooling pad: An external cooling pad provides extra airflow for intensive tasks.
- Adjust power settings: Lowering performance profiles reduces heat generation during light tasks.
- Keep your laptop on hard surfaces: Soft surfaces like beds and couches block vents and trap heat.
Combining these practices with fresh thermal paste gives your laptop the best chance at staying cool and performing well for years to come. Think of thermal paste as one piece of a larger cooling puzzle. Each element works together to keep temperatures in check.
Regular maintenance like this not only improves laptop performance but also extends the life of your investment. A few dollars and twenty minutes of your time can add years of reliable use to your device.
Final Thoughts
Applying new thermal paste to a laptop CPU GPU is one of the most impactful maintenance tasks you can perform. It is simple, affordable, and makes a noticeable difference in temperature, noise, and performance. Whether your laptop is feeling hotter than usual or you are just being proactive, repasting is a smart move.
Follow the steps in this guide carefully, avoid the common mistakes, and your laptop will thank you with cooler, quieter operation. Do not wait until your laptop starts throttling or shutting down. Take action now and enjoy the benefits of better thermal management.
Your laptop works hard for you every day. A little maintenance goes a long way toward keeping it running at its best. Grab some thermal paste, set aside twenty minutes, and give your laptop the cooling upgrade it deserves.
Frequently Asked Questions
How often should I reapply thermal paste to my laptop?
Most experts recommend reapplying thermal paste every two to three years. However, if you notice rising temperatures or louder fan noise, it may be time to reapply sooner. Regular monitoring helps you catch the need early.
Can I use too much thermal paste on my laptop CPU or GPU?
Yes, using too much paste is a common mistake. Excess paste can squeeze out onto the motherboard and potentially cause short circuits. A small pea-sized dot in the center of the processor is all you need for proper coverage.
Is liquid metal thermal paste better than regular paste for laptops?
Liquid metal offers superior thermal conductivity but is much harder to apply safely. It is electrically conductive, which means any spillage can damage components. For most laptop users, standard non-conductive thermal paste is the safer and more practical choice.
Do I need to remove the entire laptop to apply new thermal paste?
In most cases, yes. You need to remove the bottom panel and disconnect the heat sink to access the CPU and GPU. However, some slim laptops have limited internal access and may require more disassembly. Always check your specific model before starting.
What happens if I do not replace dried-out thermal paste?
Dried-out thermal paste causes poor heat transfer between the processor and heat sink. This leads to higher temperatures, louder fans, thermal throttling, and potentially shortened component lifespan. Replacing it restores proper cooling performance.
Can I apply thermal paste to both the CPU and GPU at the same time?
Absolutely. In fact, it is a great idea to replace paste on both the CPU and GPU while you have the laptop open. Both processors generate significant heat, and fresh paste on both ensures optimal cooling across the board.
=== CONCLUSION ===
Applying new thermal paste to a laptop CPU GPU is a straightforward maintenance task that delivers real results. Your laptop will run cooler, quieter, and faster with fresh paste. The process takes just twenty minutes and costs very little. Follow the steps outlined in this guide, avoid common pitfalls, and your laptop will stay in great shape for years to come.