Clean Laptop Fan Without Taking It Apart
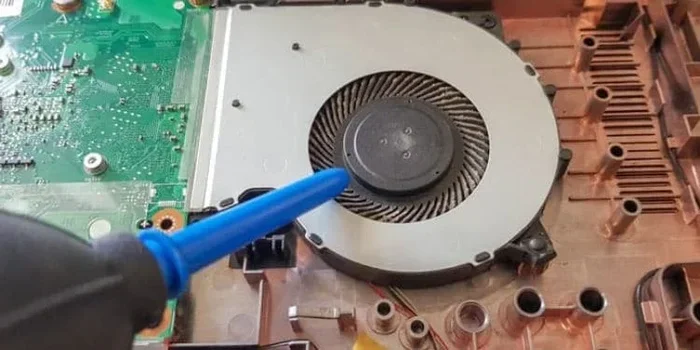
Keeping your laptop fan clean is one of the easiest ways to boost performance and prevent overheating. You do not need to open up your machine or hire a technician. With a few simple tools like compressed air and a soft brush, you can remove dust buildup and keep your laptop running smoothly. This guide walks you through every safe method to clean laptop fan without taking it apart at home.
Your laptop works hard every single day. It runs apps, streams videos, and handles multitasking like a champ. But all that work creates heat, and heat needs somewhere to go. That is where your laptop fan comes in.
Over time, dust and lint build up inside your machine. They clog the vents and coat the fan blades. This makes your laptop work harder, run hotter, and sound like a jet engine. The good news is that you do not need to take your laptop apart to fix this.
In this guide, you will learn how to clean laptop fan without taking it apart. We will cover every safe method, the tools you need, and simple steps you can follow right now. Whether your laptop sounds like a helicopter or just runs warm, this article has you covered.
Dust is everywhere. It settles on desks, drifts through rooms, and sneaks into your laptop vents. Even in a clean home, tiny particles find their way inside. Within a few months, a thin layer of dust can wrap around your fan and block airflow.
This buildup causes real problems. Your laptop starts to overheat, which slows down performance. The fan spins louder to compensate. Battery life drops. And in worst cases, your hardware can take serious damage. That is why regular laptop maintenance matters so much.
Many people think they need to open their laptop and clean the fan directly. But that is risky. You might damage sensitive parts, void your warranty, or make things worse. The methods in this guide let you clean effectively from the outside. No tools beyond a few household items are needed.
Key Takeaways
- No disassembly needed: You can effectively clean your laptop fan from the outside using simple tools and techniques.
- Compressed air is your best friend: It safely blows out dust from vents without touching internal parts.
- Regular cleaning prevents overheating: Dust buildup is the number one cause of laptop fan noise and overheating.
- Household items work great: Cotton swabs, soft brushes, and isopropyl alcohol can handle most cleaning needs.
- Maintenance saves money: Consistent care reduces the need for costly repairs or fan replacements.
- Safety first: Always power off your laptop and avoid using vacuums that generate static electricity.
📑 Table of Contents
Why Cleaning Your Laptop Fan Matters
Most users ignore their laptop fan until something goes wrong. By then, the damage might already be done. Understanding why cleaning matters helps you stay on top of laptop care and avoid costly repairs.
Prevents Overheating
When dust blocks your fan and vents, hot air gets trapped inside. Your laptop has no way to cool down properly. The processor works harder, and temperatures climb. This leads to thermal throttling, where your laptop slows itself down to avoid damage.
Cleaning your fan regularly keeps airflow open. Heat escapes the way it should. Your laptop stays at a safe temperature, even during heavy tasks like gaming or video editing.
Reduces Fan Noise
Is your laptop sounding like a small airplane? Dusty fan blades wobble and vibrate. They create that annoying grinding or whirring noise. A clean fan spins smoothly and quietly.
You can learn more about general laptop maintenance and cleaning routines in our article on how often you should clean your laptop. It covers a full cleaning schedule that keeps your machine in top shape.
Extends Laptop Lifespan
Heat is the enemy of electronics. Constant overheating degrades components faster. Your battery swells. Your hard drive wears out. Your motherboard takes stress. By keeping your fan clean, you protect every part inside your machine.
A well-maintained laptop can last years longer than a neglected one. Simple cleaning habits pay off big time in the long run.
Tools You Will Need
You do not need expensive equipment to clean your laptop fan. Most of what you need is already in your home. Here is a simple list of tools that work great:
- Compressed air canister: The most effective tool for blowing dust out of vents. Available at any office supply store.
- Soft-bristled brush: A clean, dry paintbrush or makeup brush works perfectly. It gently loosens dust without scratching surfaces.
- Cotton swabs: Great for reaching into tight spaces around vents and edges.
- Isopropyl alcohol: A small amount helps clean sticky residue. Check our guide on the correct isopropyl alcohol ratio for cleaning for safe usage tips.
- Microfiber cloth: Perfect for wiping down exterior surfaces and vents.
- Rubber eraser: Surprisingly useful for cleaning contact points and removing grime from vent grills.
Avoid using a household vacuum cleaner. Vacuums generate static electricity that can damage your laptop components. Stick to compressed air and gentle tools instead.
How To Clean Laptop Fan Without Taking It Apart
Now let us get into the actual cleaning process. Follow these steps carefully and your laptop fan will be dust-free in no time.
Step 1: Power Off and Unplug
Before you do anything, turn off your laptop completely. Do not just put it to sleep. Unplug the power cable and disconnect any external devices. This ensures your safety and prevents any electrical damage while cleaning.
Let your laptop cool down for at least 15 minutes. You do not want to touch hot components, and warm internal parts attract more dust during cleaning.
Step 2: Locate the Vents
Flip your laptop over or look at the sides and bottom. You will see small grilles or slits. These are your air vents. The fan pulls air in through these openings and pushes hot air out.
Most laptops have vents on the bottom and sometimes on the sides. Some models also have an exhaust vent near the hinge area. Find all of them before you start cleaning.
Step 3: Use Compressed Air
This is the most powerful step. Hold the compressed air canister upright and spray short bursts into each vent. Keep the nozzle about two inches away from the surface.
Do not tilt the canister sideways or upside down. This can cause liquid propellant to spray out, which could damage your laptop. Use quick, controlled bursts.
While you spray, hold the fan blades in place. You can do this by gently inserting a toothpick or small stick through the vent grille. This prevents the fan from spinning too fast, which could generate back voltage and damage the motherboard.
You will likely see a cloud of dust come out. That is a good sign. Keep spraying until the air coming out looks clear.
Step 4: Brush Away Remaining Dust
After using compressed air, some dust will still cling to the vent grille. Take your soft-bristled brush and gently sweep around the edges. Use small circular motions.
For stubborn dust, dampen a cotton swab slightly with isopropyl alcohol and carefully wipe the vent surface. Let it dry completely before you turn your laptop back on.
If you want to keep your laptop looking clean on the outside too, check out our article on the best way to clean your laptop screen for safe and effective exterior care.
Step 5: Clean the Area Around Your Laptop
While you are at it, clean the surface where you use your laptop. A dusty desk means more dust enters your machine. Wipe down your workspace with a damp cloth. This simple habit reduces how fast dust builds up inside your laptop.
You can also place your laptop on a hard, flat surface. Avoid using it on beds, couches, or blankets. These soft surfaces block vents and trap heat against the machine.
Using a Cooling Pad for Extra Protection
After cleaning your fan, consider adding a cooling pad to your setup. A cooling pad blows extra air onto your laptop’s bottom vents. It helps your fan do its job more efficiently.
Cooling pads are especially helpful if you use your laptop for gaming or heavy work. They reduce the strain on your internal fan and keep temperatures lower. This means less dust gets pulled in over time.
Look for a cooling pad with adjustable fan speeds and a mesh surface. Avoid pads with solid surfaces that block airflow. A good cooling pad complements your cleaning routine and keeps your laptop running cooler for longer.
How Often Should You Clean Your Laptop Fan
Consistency is key when it comes to laptop maintenance. A single cleaning session helps, but regular care makes the real difference.
As a general rule, clean your laptop fan every three to six months. If you use your laptop in a dusty environment, clean it more often. Pet owners should also clean more frequently since animal fur clogs vents quickly.
Here is a simple schedule you can follow:
- Every 3 months: Quick compressed air burst into all vents.
- Every 6 months: Full cleaning session with brush and cotton swabs.
- Once a year: Deep inspection. Check for any unusual fan noise or performance drops.
Setting a reminder on your phone works wonders. Once it becomes a habit, you will barely notice the effort. But your laptop will thank you with better performance and a longer life.
Common Mistakes to Avoid
Even with good intentions, people make mistakes when cleaning their laptop fans. Here are the most common ones and how to avoid them:
- Using a vacuum cleaner: Vacuums create static electricity that can fry your laptop components. Never use one near your machine.
- Tilting the compressed air canister: This releases liquid propellant. Always keep the canister upright during use.
- Spinning the fan too fast: Letting the fan blades spin freely while blowing air can generate electricity and damage the motherboard. Always hold the blades still.
- Using water or household cleaners: These can seep into your laptop and cause short circuits. Stick to isopropyl alcohol for any damp cleaning.
- Cleaning while the laptop is still warm: Heat loosens dust and makes it stickier. Always let your laptop cool down first.
- Ignoring the problem: Waiting too long to clean lets dust build up into a hard layer that is much harder to remove.
Avoiding these mistakes keeps your laptop safe and ensures your cleaning efforts actually work. A little care goes a long way.
When To Seek Professional Help
Most laptop fan cleaning can be done without opening the machine. But sometimes, professional help is the right call. If your laptop still overheats after a thorough cleaning, the problem might be deeper.
Signs that you need professional help include:
- Your laptop shuts down unexpectedly during use.
- The fan makes loud grinding or clicking noises even after cleaning.
- You notice a burning smell coming from your machine.
- Performance drops significantly despite a clean fan and good airflow.
In these cases, the fan itself might be failing or the thermal paste between the processor and heat sink might need replacing. A technician can diagnose and fix these issues safely.
Regular cleaning prevents many of these problems from reaching that stage. But it is good to know when to stop DIY and call in the experts.
Final Thoughts
Cleaning your laptop fan without taking it apart is simple, safe, and incredibly effective. With just a can of compressed air, a soft brush, and a few minutes of your time, you can keep your laptop cool, quiet, and performing at its best.
Make it a habit to clean your vents every few months. Your laptop will run smoother, last longer, and save you from expensive repairs down the road. The effort is tiny compared to the payoff.
Start today. Grab your compressed air, find a well-lit spot, and give your laptop fan the care it deserves. Your machine will feel like new again.
Frequently Asked Questions
Can I clean my laptop fan without opening the laptop at all?
Yes, absolutely. Using compressed air through the vents is the most effective way to clean a laptop fan without opening the machine. The air blows dust out from the inside through the vent openings. This method is safe, simple, and works for most laptops without any disassembly.
How do I stop my laptop fan from spinning while I clean it?
Use a toothpick, small stick, or your finger to gently hold the fan blades in place while spraying compressed air. This prevents the fan from spinning too fast, which could generate back voltage and damage the motherboard. Never let the fan spin freely while blowing air into the vents.
Is compressed air safe for laptops?
Yes, compressed air is safe when used correctly. Always hold the canister upright and use short bursts from about two inches away. Never tilt or shake the canister, as this can release liquid propellant. Keep the nozzle away from sensitive internal components and avoid spraying for too long in one spot.
Can dust cause my laptop to overheat?
Yes, dust is one of the main causes of laptop overheating. It blocks air vents and coats fan blades, reducing airflow. When hot air cannot escape, temperatures rise quickly. This leads to slower performance, louder fan noise, and in serious cases, hardware damage. Regular dust removal keeps your laptop running at safe temperatures.
What household items can I use to clean my laptop fan?
You can use compressed air, a soft-bristled brush, cotton swabs, and isopropyl alcohol. A microfiber cloth works great for wiping exterior vents. A rubber eraser can clean grime from vent grilles. Avoid household vacuums, water, and harsh cleaning sprays, as these can damage your laptop.
How often should I clean my laptop fan to keep it in good shape?
Clean your laptop fan every three to six months for best results. If you work in a dusty area or have pets, clean it more often. A quick compressed air burst every few months keeps dust from building up. Pair this with a full cleaning session twice a year to maintain optimal airflow and cooling performance.