Powered Mixer to Powered Speakers
Connecting a powered mixer to powered speakers is simple when you follow the right steps. This guide covers cable choices, signal flow, and safety tips to protect your gear. You will learn how to set levels correctly and avoid common wiring mistakes. Read on to build a clean, reliable audio setup for your next event.
Setting up a live sound system does not have to be confusing. If you have a powered mixer to powered speakers setup, you already own two pieces that make the job easier. A powered mixer sends out a ready-to-use line signal. Powered speakers have their own built-in amplifiers. That means you skip the heavy external amp racks and keep your stage footprint smaller.
Many beginners worry about the wiring. They wonder if they need special adapters or if they might damage their gear. The good news is that the signal path is straightforward. You mostly need the right cables, a clean gain structure, and a careful power-up order. Once you understand those basics, you can plug in with confidence and focus on the music.
In this guide, we will walk through the whole process. You will learn what cables to use, how to set levels, and what mistakes to avoid. We will also share practical tips for larger rooms, longer cable runs, and future expansion. By the end, you will know how to build a reliable powered mixer to powered speakers connection that sounds clean and stays safe.
Key Takeaways
- Use balanced XLR cables: Balanced connections reduce noise and keep your signal clean over long runs.
- Check power sequencing: Always turn on the mixer first and the speakers last to prevent loud pops.
- Match signal levels: Line-level outputs from the mixer pair best with line inputs on powered speakers.
- Watch impedance and load: Powered speakers have built-in amps, so you do not need to match speaker impedance like passive setups.
- Mind cable length and quality: Keep runs under 100 feet when possible and use heavy-gauge, well-shielded cables.
- Set gains properly: Start with mixer output low, then raise speaker volume to avoid clipping and distortion.
- Plan for expandability: If you need more coverage later, learn how to add speakers without overloading your mixer outputs.
📑 Table of Contents
- Why Choose a Powered Mixer and Powered Speakers Setup
- Understanding Signal Flow and Cable Choices
- Step-by-Step Connection Guide
- Gain Staging and Level Settings
- Common Mistakes and How to Avoid Them
- Expert Tips for Clean Sound and Future Expansion
- Quick Troubleshooting Checklist
- Final Thoughts on Your Setup
Why Choose a Powered Mixer and Powered Speakers Setup
A powered mixer to powered speakers system is popular because it simplifies live sound. You do not need a separate amplifier for each speaker channel. The mixer handles the mixing and routing. The speakers handle their own power. This combination saves space, reduces cable clutter, and often lowers the chance of wiring errors.
This setup works well for small bands, church rooms, classroom events, and weekend gigs. It is also a smart choice for beginners who want a clear signal chain. Fewer components mean fewer points of failure. You can spend more time tuning the sound and less time troubleshooting rack gear.
There are a few trade-offs to keep in mind. A powered mixer may have fewer output channels than a large console. Powered speakers also rely on internal electronics, so you should protect them from heat, moisture, and rough handling. Still, for many portable and semi-permanent installs, this pairing offers a great balance of simplicity and performance.
Benefits of a Simplified Signal Chain
One big advantage is reduced setup time. You run balanced cables from the mixer outputs to the speaker inputs. There is no need to calculate speaker impedance for passive boxes or to wire amplifier channels. That makes the powered mixer to powered speakers workflow friendly for quick changeovers.
Another benefit is cleaner gain staging. Since the speakers amplify themselves, you can keep the mixer output at a healthy line level. This helps you avoid pushing the mixer too hard and introducing noise. You can then use the speaker volume controls for fine tuning in the room.
When This Setup Makes the Most Sense
This arrangement is ideal when you need mobility. If you move from room to room or venue to venue, a compact powered system is easy to pack and quick to deploy. It also suits spaces where you want a neat look without visible amp racks. For many portable PA uses, the powered mixer to powered speakers approach hits the sweet spot between power and practicality.
Understanding Signal Flow and Cable Choices
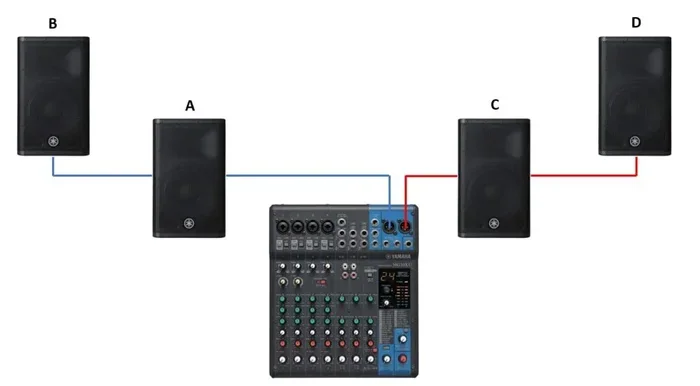
Before you plug anything in, it helps to picture the signal path. The mixer takes microphones and instruments, blends them, and sends a line-level output to the speakers. The speakers receive that signal and amplify it internally. Your main job is to carry that signal cleanly from point A to point B.

Visual guide about powered mixer connected to speakers
Image source: virtuosocentral.com
For most powered mixer to powered speakers connections, balanced XLR cables are the best choice. They reject noise and work well over moderate distances. If your mixer has TRS outputs and your speakers have TRS inputs, balanced 1/4-inch cables can also work. Just make sure both ends support the same balanced signal type.
Avoid using unbalanced cables for long runs. They pick up hum and interference more easily. If you must bridge different connector types, use a proper adapter rather than a cheap cable hack. A solid connection at every point keeps your audio clear and your system dependable.
Balanced XLR Versus TRS Connections
XLR connectors lock in place and are common on professional gear. They are sturdy and great for stage use. TRS connectors are smaller and often found on compact mixers and studio-style speakers. Both can carry balanced audio, but the physical fit matters for reliability.
If your mixer and speakers share the same connector type, use matching cables. That reduces adapter clutter and lowers the risk of a loose plug. If you need to mix connector types, choose high-quality adapters and test the run before the event. A stable powered mixer to powered speakers link starts with good physical connections.
Cable Length and Quality Tips
Keep cable runs as short as practical. Shorter cables lose less signal and pick up less noise. If you need longer runs, use well-shielded balanced cables and avoid running audio lines parallel to power cords. Crossing power cables at a right angle is better than laying them side by side.
Check your cables before each use. Look for bent pins, cracked jackets, or loose strain reliefs. A damaged cable can cause dropouts or buzzes that are hard to trace during sound check. Good cables are a small investment that protects the whole powered mixer to powered speakers chain.
Step-by-Step Connection Guide
Now let us connect the gear. Follow this order to keep the process safe and organized. A careful setup reduces pops, protects speakers, and makes sound check smoother.
Start by placing the mixer and speakers where you want them. Keep the mixer near the operator position and the speakers where the audience will hear them. Make sure the speakers sit on stable surfaces or stands. Clear the area of water, loose cables, and trip hazards.
Next, power everything down. Do not plug in or unplug audio cables while gear is on. This simple habit prevents loud pops and reduces stress on the inputs. Once everything is off, connect the cables from the mixer outputs to the speaker inputs.
Connecting the Cables the Right Way
Run balanced XLR or TRS cables from the mixer main outputs to the speaker inputs. If your mixer has left and right outputs and your speakers are stereo, connect each channel accordingly. If you use a single mono speaker or a summed setup, follow the mixer manual for the best output to use.
Secure each plug fully. A half-seated connector can cause crackling or intermittent signal loss. Label both ends of longer cables if you have multiple runs. Clear labeling helps during quick changes and keeps the powered mixer to powered speakers setup organized.
Power Sequencing and First Power-On
Power on the mixer first. Let it boot and settle before you send signal to the speakers. Then turn on the powered speakers last. This order helps avoid sudden noise bursts that can annoy the audience or stress the drivers.
When powering down, reverse the order. Turn the speakers off first, then the mixer. This practice is a simple safety habit that pays off over time. It is one of the easiest ways to protect a powered mixer to powered speakers installation.
Gain Staging and Level Settings
Getting the levels right is just as important as the wiring. Gain staging means setting each stage of the system so the signal stays strong without clipping. If the mixer output is too low, you will turn up the speakers and raise the noise floor. If the mixer output is too hot, you risk distortion before the signal even reaches the speakers.
Start with the mixer faders down and the master output low. Set the speaker input sensitivity or volume to a mid-point if the manual suggests it. Then bring up the mixer master slowly while playing music or speaking into a mic. Listen for clarity and watch for any clipping indicators.
Adjust in small steps. If you see clip lights on the mixer, lower the input gain or reduce the channel fader slightly. If the speakers have their own level controls, use them for room tuning rather than as a fix for a weak mixer output. A balanced gain structure keeps the powered mixer to powered speakers signal clean from start to finish.
Setting Mixer Output Levels
Aim for a healthy average level with occasional peaks. You do not need to max out the master output. A solid line-level signal with some headroom is usually enough. This leaves room for loud moments without squeezing the dynamic range.
Use the mixer meters as a guide, but trust your ears too. If the sound feels harsh or compressed, check whether any channel is clipping. Sometimes a single hot channel can muddy the whole mix. Smooth out the levels and the speakers will sound more natural.
Adjusting Speaker Volume Controls
Use the speaker volume knobs to match the room size and audience distance. Larger rooms may need more output, while small rooms need less. If you have multiple speakers, try to keep their settings consistent so the coverage stays even.
Avoid cranking the speakers to cover up a weak mix. It is better to fix the balance at the mixer and use the speakers for final output control. This approach keeps the powered mixer to powered speakers system operating with good clarity and less strain.
Common Mistakes and How to Avoid Them
Even a simple setup can go wrong if a few basics are missed. The good news is that most problems are easy to prevent. Here are the most common issues and what to do about them.
One frequent mistake is hot-patching cables while the system is on. This can create loud pops and, over time, may stress inputs. Always power down before connecting or disconnecting audio cables. It is a small habit that protects both the mixer and the speakers.
Another issue is poor gain staging. Some users leave the mixer output low and then push the speaker volume very high. That raises noise and can make the mix sound grainy. Others run the mixer too hot and clip the signal before it reaches the speakers. Find a balanced middle ground and check meters during sound check.
Power Order and Hot Patching Pitfalls
The power sequence matters more than many people expect. Turning on the speakers before the mixer can send a burst of noise through the system. Turning off the mixer first while the speakers are still on can do the same in reverse. Build a consistent on-off routine and stick with it.
Hot patching also includes unplugging a cable while the channel is live. If you must change a connection during a session, mute the channel or lower the master first. This simple caution keeps the powered mixer to powered speakers link safe and professional.
Cable and Connection Errors
Loose connectors are another common culprit. A plug that is not fully seated can cause crackling or dropouts that seem like gear failure. Check every connection before you start. Make sure locks on XLR plugs click into place and that TRS plugs sit flush.
Mixing up left and right outputs can confuse the stereo image. If your setup is stereo, verify which output goes to which speaker. If you are running mono, confirm that you are using the correct output per the mixer instructions. Clear labeling and a quick test save time during setup.
Expert Tips for Clean Sound and Future Expansion
Once your core system sounds good, you can refine it further. Small adjustments often make a big difference in clarity and coverage. These tips help you get more from a powered mixer to powered speakers setup without adding unnecessary complexity.
First, keep your mixer position logical. Place it where you can hear the room, not just the desk. If possible, do a short walk during sound check to hear how the speakers cover the space. That helps you set levels and EQ with the audience in mind.
Second, manage your cables neatly. Use zip ties, Velcro straps, or cable ramps to keep runs tidy. Neat cabling reduces accidents and makes troubleshooting faster. It also looks more professional, which matters for recurring events.
Managing Feedback and Room Acoustics
Feedback happens when a microphone picks up its own sound from the speakers. To reduce it, keep mics behind the speaker plane when possible and avoid aiming them directly at the speakers. Use the mixer EQ to tame problem frequencies, but make gentle changes rather than aggressive cuts.
Room shape matters too. Hard surfaces can make sound harsh, while soft furnishings can soften it. If the room feels boomy, try small EQ adjustments and reposition the speakers slightly. A well-placed powered mixer to powered speakers system often sounds better than a more powerful one placed poorly.
Planning for More Speakers Later
If your space grows, you may want to add more speakers. Before you do, check how your mixer outputs are used and whether you need additional routing. If you plan to expand, think about how you will split signals or add extra outputs without overloading the mixer. For more ideas on scaling a similar setup, you can read about how to connect multiple speakers to a receiver.
When adding gear, keep the power sequence and gain structure consistent. New speakers should match the existing setup in handling and volume settings as much as possible. That keeps the whole system balanced and easier to manage. Planning ahead makes future upgrades smoother and safer.
Quick Troubleshooting Checklist
If something sounds off, work through the basics first. Most issues have a simple cause. Use this checklist before assuming the gear is faulty.
Check power first. Make sure the mixer and speakers are on and that their power indicators show normal status. Then check cables. Reseat each plug and look for damage. A loose or broken cable is a very common source of noise.
Next, check levels. Confirm that the master output is up enough and that no channel is clipping badly. Listen for hum, buzz, or crackle and trace it to a specific cable or input. If the problem disappears when you swap a cable, you have likely found the issue.
- No sound: Verify power, input selection, and cable seating.
- Hum or buzz: Use balanced cables, separate audio from power runs, and check ground connections.
- Distortion: Lower hot channels, reduce master output slightly, and avoid overdriving the speakers.
- Intermittent audio: Reseat plugs, inspect cable insulation, and test with a known-good cable.
If you still hear a problem, isolate it step by step. Test one speaker at a time. Test one mixer output at a time. This method narrows the cause quickly and keeps the troubleshooting process calm and organized.
Final Thoughts on Your Setup
A powered mixer to powered speakers system is a practical choice for many events. It keeps the signal chain simple, reduces external amp gear, and gives you a clear path to good sound. With the right cables, a careful power order, and sensible gain staging, you can build a setup that is both reliable and easy to use.
Remember the basics. Use balanced connections, power up in the correct order, and set levels with headroom in mind. Keep cables tidy, test before the event, and make small adjustments rather than big guesses. These habits will serve you well every time you run sound.
Once you get comfortable with the workflow, you will spend less time fixing problems and more time shaping the mix. That is the real benefit of a clean powered mixer to powered speakers connection. Start simple, stay organized, and let the system do the work.
Frequently Asked Questions
Can I connect powered speakers directly to a powered mixer?
Yes, you can connect powered speakers directly to a powered mixer using balanced XLR or TRS cables. Just make sure you use the mixer main outputs and the speaker line inputs, and follow a safe power-on order.
Do I need an amplifier between the mixer and powered speakers?
No, you do not need a separate amplifier because powered speakers have built-in amps. The mixer sends a line-level signal, and the speakers amplify it themselves. Adding an extra amp is usually unnecessary for this setup.
What cable should I use for a powered mixer to powered speakers connection?
Balanced XLR cables are the most common choice, and balanced TRS cables work too if both devices support them. Use well-shielded, quality cables and keep runs as short as practical. Avoid cheap unbalanced cables for longer distances.
Which device should I turn on first?
Turn on the mixer first, then the powered speakers. When powering down, switch the speakers off first and the mixer off last. This sequence helps prevent loud pops and protects your gear.
How do I avoid clipping and distortion?
Start with low mixer output and raise it gradually while checking meters and clip lights. Keep the mixer levels healthy with headroom, and use the speaker volume controls for room tuning. If you hear distortion, lower the hottest channel or reduce the master output a bit.
Can I add more powered speakers later?
Yes, you can expand later if your mixer has enough outputs or you add proper signal routing. Plan your cable runs and keep gain staging consistent across all speakers. For broader connection ideas, you may also want to review how to connect multiple speakers to a receiver.