Golf Cart Stereo and Speakers

Turn your golf cart into a rolling concert hall. This guide walks you through picking the right stereo, wiring tips, and speaker upgrades so every round sounds better. From budget picks to pro‑level installs, we’ve got you covered.
Key Takeaways
- Match power to cart: Choose amps and speakers that suit your cart’s voltage and space.
- Weather‑proof matters: Look for marine‑grade or sealed speakers to survive rain and dust.
- Wiring basics: Proper gauge, secure connectors, and correct polarity prevent noise and damage.
- Sound quality tips: Tweeters, crossovers, and placement dramatically improve clarity.
- DIY vs. professional: Simple installs you can do yourself, plus when to call a pro.
- Budget options: Affordable kits that deliver great audio without breaking the bank.
- Maintenance tricks: Keep your system clean, check connections, and avoid common failures.
📑 Table of Contents
- Introduction: Why Your Golf Cart Deserves a Great Stereo
- 1. Understanding the Basics of Golf Cart Audio
- 2. Choosing the Right Stereo Head Unit
- 3. Picking the Perfect Speakers
- 4. Amplifier Selection and Wiring
- 5. Enhancing Sound Quality
- 6. DIY Installation vs. Professional Help
- Conclusion: Roll Out With Perfect Sound
Introduction: Why Your Golf Cart Deserves a Great Stereo
Imagine cruising the fairway with your favorite playlist blasting, the sun shining, and the kids laughing in the back. A good golf cart stereo and speakers turn an ordinary ride into an experience. Most carts ship with a tiny buzzer or no audio at all, but the technology has come a long way. Modern systems are compact, powerful, and built to survive the outdoors.
In this article we’ll break down everything you need to know: how to pick the right components, how to wire them safely, and how to get the best sound quality without spending a fortune. Think of it as a friendly chat over a coffee, only the coffee is replaced by a cool bass line.
1. Understanding the Basics of Golf Cart Audio
1.1 Power and Voltage
Most golf carts run on 36 V or 48 V batteries. Your stereo and amplifier must match that voltage. A 12 V car stereo can work, but you’ll need a step‑down converter or a dedicated 12 V power source. Using the wrong voltage can fry the amp or give you weak sound.

Visual guide about Golf Cart Stereo and Speakers
Image source: slidewalla.com
1.2 Speaker Size and Fit
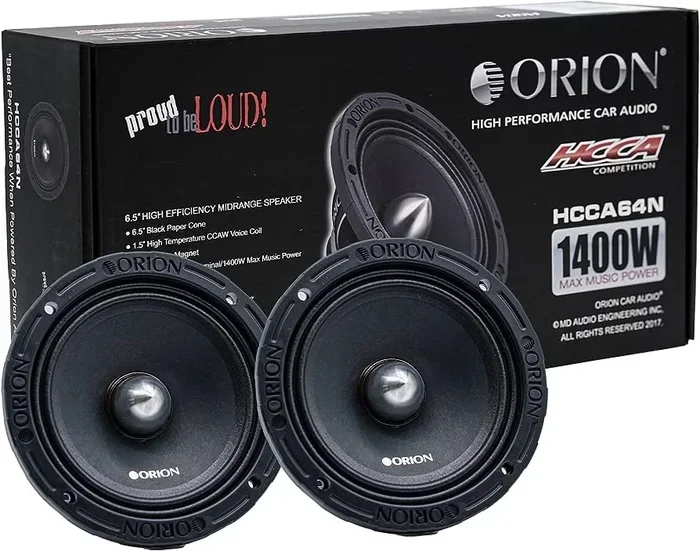
Cart cabins are tight, so most people choose 4‑inch or 5‑inch speakers. However, 6‑inch marine‑grade speakers fit nicely in larger carts and provide richer bass. Measure the mounting holes before buying.
1.3 Weather‑Resistance
Because carts are often left outside, look for “marine” or “outdoor” rated speakers. These have sealed enclosures that keep moisture out, just like the car speakers that handle rain and dust.
2. Choosing the Right Stereo Head Unit
2.1 Features to Look For
- Bluetooth: Stream from your phone with no cables.
- USB/aux inputs: Connect MP3 players or USB drives.
- Touchscreen: Easy navigation and optional GPS integration.
- Equalizer: Tweak bass, mids, and treble for the cart’s acoustics.
2.2 Popular Brands and Models
Brands like Alpine, Kenwood, and Pioneer make compact units that fit under the dash. For a budget‑friendly option, the 5 and a quarter speakers combo kits often include a head unit and a pair of speakers at a discount.
2.3 Installing the Head Unit
Most carts have a simple 12‑V accessory socket. You’ll need a mounting bracket, a wiring harness adapter, and a few zip ties. Disconnect the battery before you start, then route the power wire to the battery, the ground to a clean metal spot, and the speaker wires to the back of the amp.
3. Picking the Perfect Speakers
3.1 Types of Speakers
Coil‑magnet speakers deliver warm mids, while piezo‑ceramic tweeters add crisp highs. A two‑way system (woofer + tweeter) is ideal for most carts.

Visual guide about Golf Cart Stereo and Speakers
Image source: timesofindia.indiatimes.com
3.2 Impedance Matching
Most cart amps are 4 Ω. If you pair two 8 Ω speakers in series, you’ll get a 16 Ω load, which can make the amp work harder. Learn how to wire them correctly in the 2 8 Ohm Speakers In Series guide.
3.3 Power Handling (Wattage)
Don’t be fooled by “high‑watt” claims. A speaker rated for 50 W RMS will handle most cart amps nicely. Over‑powering can cause distortion, while under‑powering can lead to “crackle” – see our article on Why Do My Speakers Crackle for troubleshooting tips.
3.4 Placement Tips
- Mount woofers on the rear panel for balanced bass.
- Place tweeters near the driver’s ear level for clear highs.
- Use vibration‑damping foam behind speakers to reduce rattles.
4. Amplifier Selection and Wiring
4.1 How Much Power Do You Need?
A good rule is 2–3 × the speaker’s RMS rating. For a 50 W speaker, a 100–150 W amp works well without blowing the speakers.
4.2 Wiring Gauge and Length
Long runs need thicker wire to avoid voltage drop. For runs under 5 ft, 16‑gauge is fine; over 5 ft, step up to 14‑gauge. Use marine‑grade connectors to keep corrosion at bay.
4.3 Connecting the Amp
- Run a positive (+) lead from the battery to the amp’s power input.
- Install an inline fuse within 12 inches of the battery (usually 30 A for a 150 W amp).
- Ground the amp to a clean metal part of the frame.
- Run speaker wires from the amp to each speaker, observing polarity (+ to +, – to –).
- Connect the head unit’s RCA outputs to the amp’s input.
4.4 Protecting Your System
Use a power distribution block with a fuse for each major component. This prevents a short in one part from draining the whole battery.
5. Enhancing Sound Quality
5.1 Adding a Crossover
A crossover splits audio frequencies so woofers handle lows and tweeters handle highs. Most two‑way speaker kits include a passive crossover, but an active crossover can be added for finer control.
5.2 Equalizer Settings
Start with a flat EQ, then boost bass 2–3 dB and highs 1–2 dB. Avoid extreme boosts; they can cause distortion and waste battery power.
5.3 Sound‑Deadening Materials
Install thin foam panels on the cart walls to reduce echo. This makes music sound tighter and improves bass response.
5.4 Upgrading the Subwoofer (Optional)
If you love deep bass, consider a small 8‑inch subwoofer in a sealed box. Pair it with a dedicated sub‑amp and set the crossover around 80 Hz.
6. DIY Installation vs. Professional Help
6.1 When to DIY
If you’re comfortable with basic wiring, a simple head unit and speaker swap can be done in an afternoon. Use a wiring diagram, label each wire, and double‑check connections.
6.2 When to Call a Pro
- Installing a high‑power amp that requires custom mounting.
- Running speaker wires through the frame or under the seat.
- Integrating a custom enclosure or subwoofer.
Professional installers can also provide warranty protection for the equipment.
Conclusion: Roll Out With Perfect Sound
Upgrading your golf cart stereo and speakers doesn’t have to be a headache. By matching power, choosing weather‑proof speakers, and wiring everything cleanly, you’ll enjoy crystal‑clear music on every round. Whether you’re a DIY enthusiast or prefer a pro install, the steps above give you a solid roadmap. So fire up the Bluetooth, crank the volume, and let the fairway become your personal concert venue.
Frequently Asked Questions
What voltage should my golf cart stereo system use?
Most carts run on 36 V or 48 V. Choose a head unit that works on 12 V and use a step‑down converter, or pick a system designed for the cart’s voltage.
Can I use regular car speakers in a golf cart?
Yes, but marine‑grade or sealed speakers are better because they resist moisture and dust. Also make sure the impedance matches your amp.
How do I protect my audio system from rain?
Install speakers with a waterproof rating, seal all connectors with dielectric grease, and cover the head unit with a weather‑proof enclosure.
Do I need a separate amplifier?
If you want more than basic sound, a small 100–150 W amp will give you cleaner volume and better bass response than a head unit’s built‑in amp.
What’s the best way to wire speakers to avoid noise?
Use the correct gauge wire, keep speaker runs short, secure all connections, and ensure proper polarity. A solid ground and a clean power supply also reduce hiss.
How often should I check my golf cart audio system?
Inspect connections and speaker mounts every few months, especially after exposure to rain or heavy use. Tighten any loose bolts and clean off corrosion to keep sound crisp.