How to Bi Wire Speakers
Bi‑wiring speakers separates the high‑ and low‑frequency drivers, giving cleaner sound and more detail. Follow this friendly guide to gather tools, understand wiring basics, and connect your speakers like a pro—no electrician required.
Key Takeaways
- Bi‑wiring basics: Using two separate pairs of conductors improves driver control and reduces interference.
- Required tools: You only need a good pair of speaker‑grade wire, a wire stripper, and optional banana plugs.
- Compatible speakers: Look for speakers with dual binding posts or separate high‑ and low‑frequency terminals.
- Step‑by‑step process: From measuring wire length to testing polarity, each step is explained in plain language.
- Common mistakes: Avoid crossing wires, mixing polarities, and using undersized gauge for long runs.
- Performance boost: Proper bi‑wiring can tighten bass, clarify mids, and add sparkle to highs.
- Future upgrades: Once you master bi‑wiring, you can explore bi‑amping or adding crossovers for even more control.
📑 Table of Contents
- Introduction: Why Bi‑Wiring Matters
- 1. Understanding the Theory Behind Bi‑Wiring
- 2. Gathering the Right Tools and Materials
- 3. Preparing Your Speakers for Bi‑Wiring
- 4. Step‑by‑Step Guide: How to Bi‑Wire Speakers
- 5. Tips and Tricks for Optimal Performance
- 6. Troubleshooting Common Issues
- Conclusion: Bring Your Music to Life
Introduction: Why Bi‑Wiring Matters
Imagine listening to your favorite song and hearing every instrument as if it were playing right in front of you. That’s the promise of bi‑wiring speakers. When a speaker has separate terminals for the tweeter (high frequencies) and the woofer (low frequencies), you can run two distinct signal paths instead of sharing one. The result is less magnetic interaction, cleaner separation, and a more detailed soundstage.
Many audiophiles swear by bi‑wiring, but the process sounds intimidating to newcomers. In reality, it’s a simple wiring project that anyone with a few tools can finish in under an hour. This guide will walk you through everything you need to know about how to bi‑wire speakers, from choosing the right wire to testing your final setup.
1. Understanding the Theory Behind Bi‑Wiring
What is Bi‑Wiring?
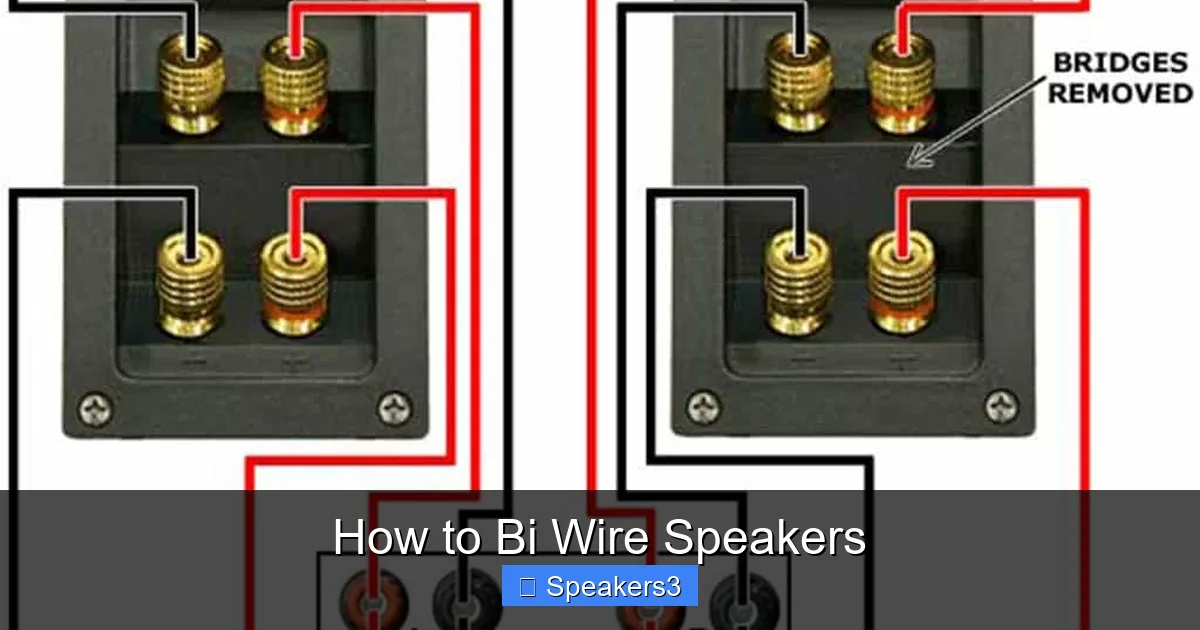
Bi‑wiring means connecting the high‑frequency (HF) driver and the low‑frequency (LF) driver with separate pairs of conductors. Most speakers that support bi‑wiring have two sets of binding posts: one pair for the tweeter and one pair for the woofer. The internal crossover still routes the signal, but each driver gets its own dedicated path from the amplifier.
Visual guide about How to Bi Wire Speakers
Image source: alpha-audio.nl
How It Improves Sound
- Reduced crossover interference: The HF and LF signals travel on separate wires, so they don’t “talk” to each other.
- Better damping: Each driver receives a cleaner voltage, which helps control cone movement.
- Higher power handling: The amplifier’s current is split, giving each driver a more efficient power delivery.
Bi‑Wiring vs. Bi‑Amping
Bi‑amping uses two separate amplifier channels—one for the tweeter and one for the woofer—while bi‑wiring still uses a single amplifier channel. If you’re wondering whether to bi‑wire or bi‑amp, start with bi‑wiring; it’s the easiest upgrade and often provides a noticeable improvement without extra equipment.
2. Gathering the Right Tools and Materials
Essential Supplies
- Speaker‑grade wire: 14‑ to 16‑gauge stranded copper is ideal for most home setups.
- Wire stripper/cutter: A good quality stripper will save you time and prevent nicked wires.
- Banana plugs or spade connectors (optional): These make future changes easier and look tidy.
- Screwdriver: Needed if your binding posts require a screw to tighten.
- Measuring tape: To cut the correct length of wire for each speaker.
Choosing the Right Wire Length
Measure from your amp or receiver to each speaker, then add a few extra inches for routing around furniture. Too much slack can look messy; too little can strain the connections.
Visual guide about How to Bi Wire Speakers
Image source: i.ytimg.com
Safety First
Always turn off and unplug your amplifier before touching any speaker terminals. This prevents accidental short circuits and protects your hearing.
3. Preparing Your Speakers for Bi‑Wiring
Identify Dual Binding Posts
Look at the back of each speaker. If you see two pairs of metal posts—usually labeled “HF” and “LF” or “TWEETER” and “WOOFER”—the speaker is ready for bi‑wiring. Some models use a single post with a “bridge” that can be split; check the manual to confirm.
Visual guide about How to Bi Wire Speakers
Image source: pic3.zhimg.com
Mark Polarity
Most speakers have a red (+) and black (–) terminal for each driver. Use a small piece of tape or a marker to label the wires accordingly. Keeping polarity consistent across all speakers avoids phase issues that can muddy the sound.
Strip the Wire
Strip about ½ inch of insulation from each end of the wire. Twist the strands gently to keep them tight and prevent fraying.
4. Step‑by‑Step Guide: How to Bi‑Wire Speakers
Step 1 – Connect the Amplifier
Take the first pair of speaker wire and connect the positive (+) lead to the amplifier’s “Front Left” (+) terminal and the negative (–) lead to “Front Left” (–). Repeat for the right channel. If you’re using banana plugs, attach them now for a cleaner connection.
Step 2 – Run the High‑Frequency Wire
From the amplifier’s left channel, run a second pair of wire to the left speaker’s “HF” (or “TWEETER”) binding post. Connect positive to the red (+) post and negative to the black (–) post. Do the same for the right speaker.
Step 3 – Run the Low‑Frequency Wire
Take a third pair of wire and connect it from the same amplifier terminals (you can use the same binding posts you used for the HF wire) to the “LF” (or “WOOFER”) terminals on each speaker. Again, match polarity.
Step 4 – Secure All Connections
Make sure each binding post is tightened firmly but not over‑tightened, which could damage the post. Double‑check that no stray strands are touching other terminals.
Step 5 – Test the Setup
Power on your amplifier and play a familiar track. Listen for clear separation between bass and treble. If something sounds dull or muted, re‑check polarity and ensure all connections are solid.
Step 6 – Tidy Up
Bundle excess wire with zip ties or Velcro straps. This not only looks neat but also reduces the chance of accidental pulls.
5. Tips and Tricks for Optimal Performance
Use Quality Wire
Don’t skimp on cheap, thin wire. Higher‑gauge (thicker) wire reduces resistance, especially over long runs, preserving signal integrity.
Keep Wire Runs Short
Longer wires increase resistance and can introduce noise. If you need to run wires across a room, consider using speaker cables with built‑in shielding.
Maintain Consistent Polarity
Even a single reversed speaker can cause phase cancellation, making the sound feel thin. Use a battery tester or a simple multimeter to verify polarity if you’re unsure.
Consider Bi‑Amping Later
Once you’re comfortable with bi‑wiring, you might upgrade to bi‑amping. The same wiring scheme applies, but you’ll need a receiver with separate amp channels for each driver.
Match Impedance
Bi‑wiring does not change the speaker’s impedance, but ensure your amplifier can handle the total load. Most modern receivers can, but double‑check the specs.
Internal Linking Example
If you’re new to speaker connections, you might also want to read our guide on how to wire speakers to amp for basic wiring concepts before diving into bi‑wiring.
6. Troubleshooting Common Issues
No Sound from One Driver
Check that the wire is properly seated in the correct HF or LF terminal. Verify that the polarity matches the other speaker.
Buzzing or Hum
Ground loops can cause hum. Ensure your amplifier and source components share a common ground, and keep speaker cables away from power cords.
Weaker Bass After Bi‑Wiring
This may be due to a loose connection on the LF terminal. Re‑tighten the binding post and listen again.
Overheating Amplifier
If the amp feels hot, you might be running a speaker with too low an impedance or using undersized wire. Verify specs and consider a higher‑gauge cable.
Conclusion: Bring Your Music to Life
Learning how to bi‑wire speakers is a small investment of time that can pay big dividends in sound clarity. By separating the signal paths for the tweeter and woofer, you give each driver the clean power it deserves. Follow the steps outlined above, keep your connections tidy, and enjoy a richer, more immersive listening experience. Whether you’re upgrading a home theater or a dedicated music room, bi‑wiring is a practical, cost‑effective way to get the most out of your speakers.
Ready to explore more audio projects? Check out our article on how to get speakers sight destiny 2 for fun ways to integrate gaming sound into your setup. And if you love tweaking tech, you might also enjoy learning how to upgrade RAM on a laptop—the same attention to detail applies!
Frequently Asked Questions
Do I need a special amplifier to bi‑wire speakers?
No. A standard stereo or home‑theater amplifier works fine. Bi‑wiring simply splits the signal within the same channel.
Can I bi‑wire any speaker?
Only speakers with dual binding posts or separate HF/LF terminals support bi‑wiring. Check the manufacturer’s specs before starting.
Will bi‑wiring damage my speakers?
When done correctly, bi‑wiring is safe. The only risk is a loose or reversed connection, which can cause poor sound but not permanent damage.
Is there a noticeable difference on low‑budget speakers?
Even budget speakers can benefit from reduced crossover interference, giving a clearer mids and tighter bass. The improvement may be subtle but is often measurable.
Should I use banana plugs or bare wire?
Both work. Banana plugs make future changes easier and look cleaner, while bare wire is perfectly fine if you’re comfortable tightening the posts securely.
Can I bi‑wire and bi‑amp at the same time?
Yes, but you’ll need a receiver with separate amp channels for each driver. This setup offers the ultimate control but requires more equipment.