How to Upgrade the Ram of a Laptop

Upgrading your laptop RAM is one of the easiest and most affordable ways to speed up your machine. This guide walks you through everything from checking your current RAM to installing new memory sticks. You will learn how to find compatible RAM, open your laptop safely, and upgrade the RAM of a laptop in under 30 minutes.
Is your laptop running slow? Do apps take forever to open, and your browser keeps freezing with too many tabs? You are not alone. Many laptop users face these frustrating issues every day. The good news is that upgrading the RAM of a laptop can make a huge difference. It is one of the simplest and cheapest upgrades you can do at home.
Random Access Memory, or RAM, is the short-term memory your laptop uses to handle tasks. More RAM means your laptop can juggle more apps at once without slowing down. Whether you are a student, a remote worker, or a casual gamer, adding memory can transform your experience. In this guide, we will show you exactly how to do it step by step.
Before you buy anything, you need to know what your laptop currently has. You can check the RAM of your laptop using built-in tools or free software. This tells you what type of RAM you need and how many memory slots are available. Taking this step first saves you time and money.
We will cover everything from understanding RAM types to the actual installation process. You will also learn about common mistakes to avoid and tips from experts. By the end of this article, you will feel confident enough to upgrade the RAM of a laptop on your own. Let us get started.
Key Takeaways
- Check Compatibility First: Always verify your laptop model supports the RAM type and capacity you want to install.
- Gather the Right Tools: A screwdriver, anti-static wrist strap, and your new RAM stick are all you need.
- Follow Safety Steps: Power off your laptop, disconnect power, and ground yourself before touching internal components.
- Install Carefully: Align the notch on the RAM stick with the slot and press firmly until it clicks.
- Verify After Installation: Use built-in tools or software to confirm the new RAM is recognized and working.
- Know When to Stop: Every laptop has a max RAM limit. Check your specs before buying extra memory.
- Consider Professional Help: If you feel unsure, a technician can upgrade the RAM of a laptop safely for you.
📑 Table of Contents
Understanding Laptop RAM
RAM is a key part of your laptop’s performance. It temporarily stores data that your processor needs to access quickly. Think of it as your laptop’s short-term workspace. The more workspace you have, the smoother your multitasking experience becomes.
What Is RAM and Why Does It Matter?
Every app you open uses RAM. Your web browser, word processor, video editor, and games all compete for memory. If you run out of RAM, your laptop starts using your hard drive as temporary storage. This is called paging or swapping, and it makes everything painfully slow.
Upgrading your RAM gives your laptop more breathing room. You can keep more apps open at once without slowdowns. For basic tasks like browsing and word processing, 8GB of RAM is usually enough. But for video editing, programming, or gaming, 16GB or more makes a big difference.
Types of RAM: DDR4 vs DDR5
Laptops use small memory modules called SO-DIMMs. These are different from the RAM sticks used in desktop computers. The two most common types today are DDR4 and DDR5.
DDR4 RAM has been the standard for several years. It offers solid performance and is widely available. DDR5 is the newer standard. It provides faster speeds and better efficiency. However, not all laptops support DDR5. You need to check your laptop’s specifications before buying.
Here is a quick comparison of the two types:
| Feature | DDR4 | DDR5 |
|---|---|---|
| Speed Range | 2133 MHz to 3200 MHz | 4800 MHz to 6400 MHz |
| Voltage | 1.2V | 1.1V |
| Availability | Very common | Growing |
| Price | Affordable | Slightly higher |
| Max Capacity per Stick | Up to 32GB | Up to 64GB |
Most older laptops use DDR4. Newer models may support DDR5. You can find out which type your laptop needs by checking the manufacturer’s website or using a system information tool.
How Much RAM Do You Actually Need?
The right amount of RAM depends on how you use your laptop. Here is a simple breakdown:
- 4GB: Basic tasks like web browsing and document editing. This is the bare minimum today.
- 8GB: Good for everyday use. Handles multiple browser tabs, office apps, and light gaming.
- 16GB: Great for multitasking, photo editing, and moderate gaming.
- 32GB or more: Ideal for video editing, 3D rendering, and heavy programming workloads.
Most users will see a big improvement by going from 4GB or 8GB to 16GB. If your laptop supports it, that is the sweet spot for performance.
Checking Your Laptop’s RAM Before Upgrading
You should never buy RAM without checking your laptop first. Different laptops have different limits and requirements. Taking a few minutes to verify compatibility saves you from buying the wrong part.
How to Find Your Current RAM Details
Windows makes it easy to check your current RAM. Simply right-click on the taskbar and select Task Manager. Go to the Performance tab and click on Memory. You will see how much RAM you have, what type it is, and how many slots are in use.
On a Mac, click the Apple menu and choose About This Mac. You will see the memory information right there. For more detailed info, you can use free tools like Crucial System Scanner or CPU-Z. These tools scan your laptop and tell you exactly what RAM is compatible.
Another great resource is your laptop manufacturer’s website. Look up your exact model number and check the specifications page. This tells you the maximum RAM supported, the RAM type, and the number of available slots.
If you want a deeper look into your current memory configuration, you can find detailed RAM information for your laptop using free diagnostic tools. This helps you plan your upgrade with confidence.
Understanding RAM Speed and Latency
When shopping for RAM, you will see numbers like 3200MHz and CL16. The MHz number is the speed, also called frequency. Higher MHz generally means faster data transfer. But speed is not the only factor. Latency, measured in CAS Latency (CL), also matters.
For most laptop upgrades, matching your existing RAM speed is the safest choice. Mixing different speeds can work, but the system will default to the slower speed. If you are replacing all your RAM, aim for the highest speed your laptop supports.
Tools and Preparation for the Upgrade
Before you open your laptop, gather everything you need. Having the right tools makes the process smooth and stress-free. You do not need much, but having the correct items is important.
What You Will Need
- A small Phillips-head screwdriver (usually size #1)
- An anti-static wrist strap (optional but recommended)
- A clean, flat workspace with good lighting
- The new RAM stick (SO-DIMM format)
- A soft cloth or anti-static mat
- Your laptop’s user manual or a service guide for your model
Safety First: Grounding Yourself
Static electricity can damage your laptop’s internal components. Before you touch anything inside, ground yourself. You can wear an anti-static wrist strap connected to a metal surface. If you do not have one, simply touch a metal object like a doorknob or the metal frame of your laptop before starting.
Work on a hard, non-carpeted surface. Avoid working in rooms with a lot of static, like areas with wool carpets. These simple precautions protect your laptop and your new RAM.
Backing Up Your Data
While upgrading RAM rarely causes data loss, it is always smart to back up important files first. Copy your documents, photos, and important folders to an external drive or cloud storage. This way, you have nothing to worry about during the process.
You can find out how much RAM your laptop currently has and back up any large files that might be taking up space before you begin.
Step-by-Step Guide to Upgrading Laptop RAM
Now comes the fun part. Installing RAM is easier than most people think. You do not need to be a tech expert. Follow these steps carefully and you will have your new memory installed in no time.
Step 1: Power Off and Unplug Your Laptop
Turn off your laptop completely. Do not just put it to sleep. Shut it down fully. Then unplug the power adapter and disconnect any external devices. Remove USB drives, external hard drives, and headphones. This ensures safety and prevents any electrical issues during the upgrade.
Step 2: Remove the Battery (If Possible)
Some laptops have removable batteries. If yours does, take it out. This adds an extra layer of safety by disconnecting power from the motherboard. For laptops with built-in batteries, simply unplug the power adapter and hold the power button for 15 seconds to discharge any remaining electricity.
Step 3: Open the Laptop Back Panel
Flip your laptop over and locate the screws on the bottom panel. Use your screwdriver to remove them. Keep the screws in a safe place, like a small bowl or magnetic mat. Different screws may be different sizes, so pay attention to where each one came from.
Carefully lift off the back panel. Some laptops have clips that hold the panel in place. Gently pry them open with a plastic spudger or your fingernail. Avoid using metal tools, as they can scratch or damage the laptop.
Step 4: Locate the RAM Slots
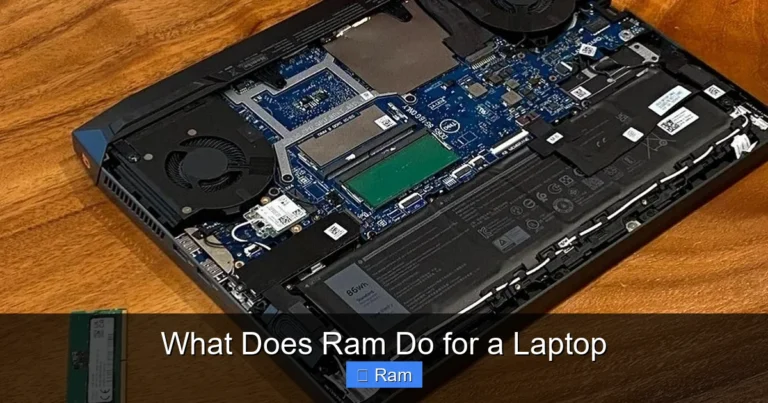
Once the panel is off, look for the RAM slots. They are long, thin slots with small metal clips on each end. Most laptops have one or two RAM slots. If one slot is already occupied, you may have a free slot to use. If both slots are full, you will need to remove the existing RAM to install the new modules.
Step 5: Remove the Old RAM (If Necessary)
To remove existing RAM, gently push the metal clips on either side of the stick outward. The RAM will pop up at an angle. Then carefully pull it straight out. Hold the new RAM stick by the edges and avoid touching the gold contacts on the bottom.
Step 6: Install the New RAM
Take your new RAM stick out of its anti-static bag. Hold it by the edges. Align the notch on the bottom of the RAM stick with the ridge inside the slot. Insert the stick at a 30 to 45 degree angle. Press it down firmly until the metal clips on both sides click into place.
You should feel a satisfying click when the RAM is fully seated. If it does not click, it is not installed correctly. Remove it gently and try again. Do not force it, as this can damage the slot or the module.
Step 7: Close Up and Test
Replace the back panel and screw it in place. Reconnect the battery if you removed it. Plug in the power adapter and turn on your laptop. Once it boots up, check if the new RAM is recognized.
You can verify the installation by right-clicking the Start button and selecting Task Manager. Go to the Performance tab and look at Memory. It should show the new total amount of RAM. If it does not, try reseating the RAM stick or checking for proper alignment.
For a more detailed walkthrough of the installation process, you can also refer to our guide on how to install RAM into a laptop for model-specific tips.
Common Mistakes to Avoid
Even with a good guide, mistakes can happen. Here are the most common errors people make when upgrading laptop RAM, and how to avoid them.
- Buying the wrong RAM type: DDR3, DDR4, and DDR5 are not interchangeable. Always double-check your laptop’s requirements before purchasing.
- Forcing the RAM stick: If it does not go in easily, do not force it. Check the alignment and angle. Forcing it can bend the pins and ruin the module.
- Ignoring the max RAM limit: Every laptop has a maximum RAM capacity. Buying more than your laptop supports is a waste of money.
- Skipping the grounding step: Static discharge can silently damage components. Always ground yourself before touching internal parts.
- Mixing RAM speeds carelessly: While it sometimes works, mixing different speeds can cause instability. Match the speed of your existing RAM when possible.
- Not testing before reassembly: Always boot up and verify the new RAM works before putting the back panel back on. This saves you from having to reopen the laptop if there is an issue.
Expert Tips for a Smooth RAM Upgrade
Experienced tech users know that a few extra steps can make the process even easier. Here are some insider tips to help you succeed.
First, watch a video tutorial for your specific laptop model before you start. Every laptop is slightly different, and seeing the process in action helps a lot. YouTube is full of free, detailed walkthroughs for popular models.
Second, buy RAM from reputable brands like Crucial, Kingston, Corsair, or Samsung. These brands offer reliable modules and often have compatibility tools on their websites. You can enter your laptop model and get a guaranteed compatible recommendation.
Third, consider upgrading both slots if your laptop has two. Even if one stick is still working, replacing both with identical new sticks gives you the best performance. This is called a dual-channel configuration, and it improves memory bandwidth significantly.
Finally, keep your old RAM stick. It can serve as a backup or be used in another compatible device. Some recycling programs also accept old RAM for responsible disposal.
After you complete the upgrade, you may want to explore more ways to optimize your laptop’s performance. A RAM upgrade is just the first step to a faster machine.
How to Verify Your Upgrade Was Successful
Once you have reassembled your laptop and powered it on, you need to confirm everything is working correctly. The system should recognize the new RAM immediately upon boot.
On Windows, open Task Manager and check the Memory section. You should see the updated total RAM amount. You can also open the Settings app, go to System, and click About to see the installed memory.
On macOS, click the Apple menu and choose About This Mac. The memory section will display the new RAM amount. If the system shows the correct total, your upgrade was successful.
If the new RAM is not recognized, do not panic. Try these troubleshooting steps:
- Power off and remove the RAM. Reinsert it firmly, making sure it clicks into place.
- Try the RAM stick in a different slot if your laptop has multiple slots.
- Test each RAM stick individually to rule out a defective module.
- Update your laptop’s BIOS firmware, as older BIOS versions may not recognize newer RAM modules.
For additional help with checking your memory after an upgrade, you can learn how to check RAM on your laptop using built-in diagnostic tools.
When to Seek Professional Help
Upgrading RAM is straightforward for most laptops. But some models are harder to open than others. Ultrabooks and slim laptops often have sealed or glued-back panels that are difficult to remove without damage. If your laptop falls into this category, consider getting help from a professional.
Many electronics repair shops offer RAM upgrade services for a reasonable fee. They have the right tools and experience to handle tricky laptops safely. This is also a good option if you are uncomfortable opening your device or if you are worried about voiding your warranty.
Before taking your laptop to a shop, check your warranty terms. Some manufacturers consider user-installed RAM as voiding the warranty. Others allow RAM upgrades without affecting coverage. Knowing this ahead of time saves you from surprises.
Conclusion
Upgrading the RAM of a laptop is one of the best ways to breathe new life into an aging or sluggish machine. It is affordable, fast to do, and delivers noticeable results. Whether you are a student juggling multiple apps or a professional running heavy software, more RAM makes everything smoother.
By following the steps in this guide, you can confidently open your laptop, install new memory, and enjoy a faster computing experience. Remember to check compatibility first, work safely, and verify your upgrade after installation. With just a little patience and the right tools, you can upgrade the RAM of a laptop and save money compared to buying a new device.
Start today. Check your current RAM, find the right upgrade, and give your laptop the boost it deserves. You will be amazed at the difference a simple memory upgrade can make.
Frequently Asked Questions
Can I upgrade the RAM on any laptop?
Not all laptops allow RAM upgrades. Some ultrabooks and thin laptops have soldered RAM that cannot be replaced. Check your laptop’s specifications or user manual to confirm whether your model has accessible RAM slots. If it does, you can upgrade the RAM of a laptop yourself or with professional help.
How much does it cost to upgrade laptop RAM?
The cost depends on the type and amount of RAM you need. A single 8GB DDR4 SO-DIMM typically costs between $20 and $40. A 16GB stick ranges from $40 to $80. Overall, a RAM upgrade is one of the most affordable ways to improve laptop performance.
Will upgrading RAM void my laptop warranty?
This depends on the manufacturer and your warranty terms. Some brands allow user-installed RAM without voiding the warranty. Others may consider it a violation. Check your warranty documentation or contact the manufacturer before opening your laptop to be safe.
How long does it take to upgrade laptop RAM?
For most laptops, the entire process takes about 15 to 30 minutes. This includes opening the back panel, installing the new RAM stick, and closing everything back up. Experienced users can do it even faster.
Can I mix different brands of RAM in my laptop?
Yes, you can mix RAM brands, but it is not always ideal. The system will run at the speed of the slowest module. For the best performance and stability, it is recommended to use matching RAM sticks in terms of type, speed, and capacity. If you must mix, ensure the RAM type (DDR4 or DDR5) is the same.
What happens if I install too much RAM in my laptop?
Your laptop will only recognize up to its maximum supported RAM capacity. Any excess memory beyond that limit will not be used. This is why it is important to check your laptop’s specifications before purchasing RAM. Installing RAM beyond the max limit is simply a waste of money.